Hyperstack - FAQ
Frequently Asked Questions about Hyperstack.
About Hyperstack
The Hyperstack platform is an advanced GPU cloud computing solution that provides access to high-performance NVIDIA GPUs, ideal for artificial intelligence (AI), high-performance computing (HPC), and graphics workloads. Hyperstack virtual machines offer exceptional speed and performance at cost-effective rates. Designed for user-friendly operation, the Hyperstack platform simplifies the creation and management of GPU virtual machines and related resources.
Hyperstack Tutorials
See how-to guides and learn about the features of the Hyperstack platform.
Virtual Machines
Access and secure shell (SSH)
How do I enable SSH access to my virtual machine?
Enable incoming SSH traffic to your virtual machine
To enable incoming traffic to your virtual machine, you must create a firewall rule, this can be done using Hyperstack or the Infrahub API.
- Hyperstack
- Infrahub API
To enable SSH access to your virtual machine in Hyperstack:
Within Hyperstack, navigate to the Virtual Machines page.
Click on the virtual machine for which you intend to enable SSH access.
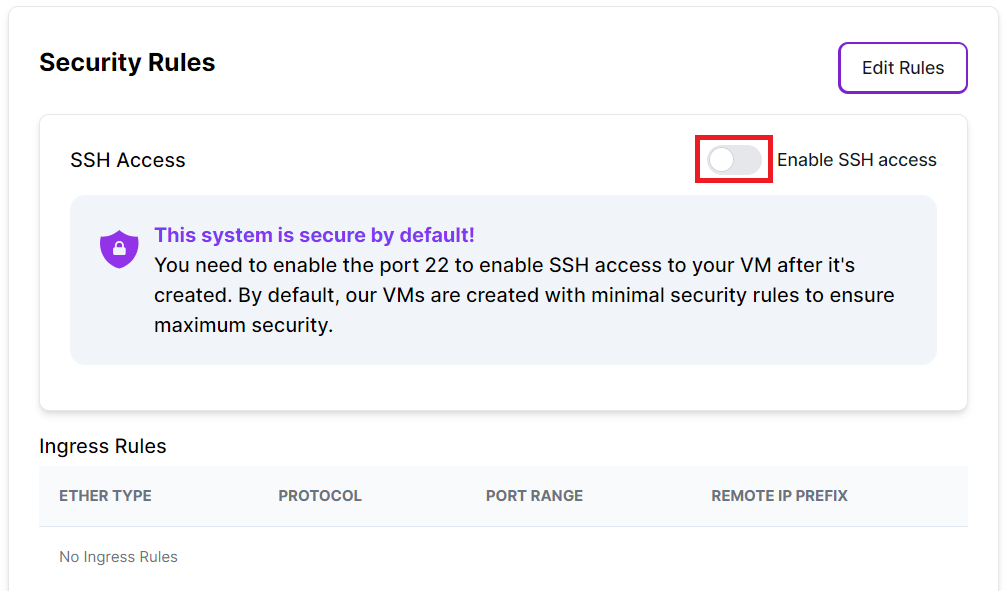
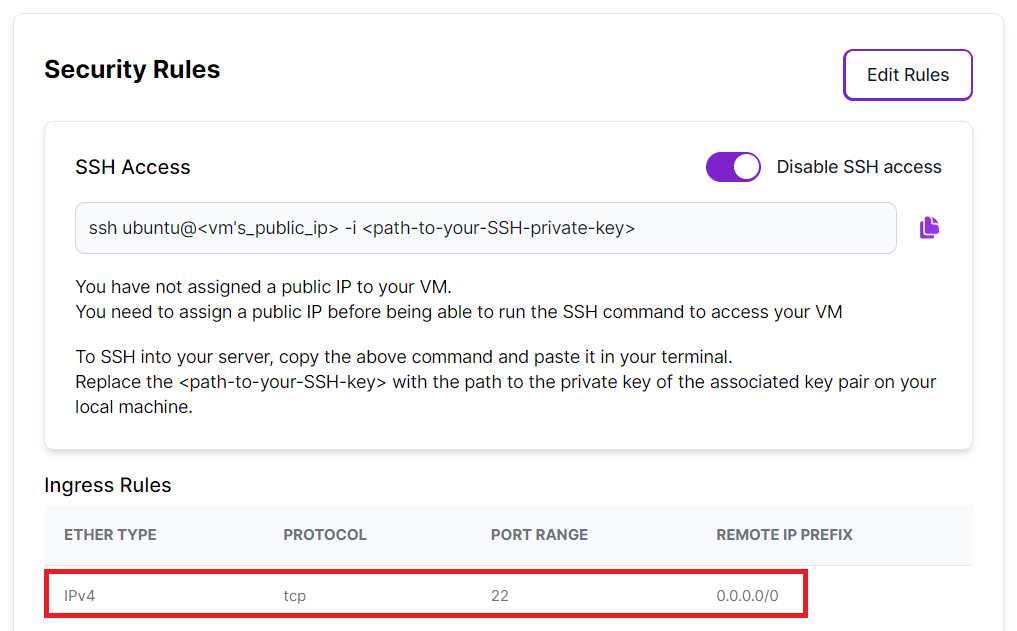
In the Firewall Rules section of the virtual machine, click the Enable SSH access button. This action will automatically generate a firewall rule allowing incoming traffic from any IP (0.0.0.0/0) on port 22 via the TCP protocol.
Before
After
Send a POST request to /core/virtual-machines/{virtual-machine-id}/sg-rules endpoint replacing virtual-machine-id in the path with the ID of the virtual machine for which you want to enable SSH access, and complete the body of the request as specified below.
- Include the integer ID of the virtual machine that this firewall rule is being attached to in the path of the request as follows:
/core/virtual-machines/{VM ID HERE}/sg-rules
Complete the request body with the following fields and values:
Field Name Field Input Description remote_ip_prefix0.0.0.0/0Allows traffic from any source IP address. directioningressDesignates that the firewall rule is for incoming traffic. ethertypeIPv4Indicates the use of Internet Protocol version 4. protocolicmpSpecifies the use of Internet Control Message Protocol. port_range_min22Specifies the minimum port value for SSH. port_range_max22Specifies the maximum port value for SSH.
curl -X POST https://infrahub-api.nexgencloud.com/core/virtual-machines/{virtual-machine-id}/sg-rules \
  -H "accept: application/json" \
  -H "api_key: YOUR API KEY" \
  -d '{
        "remote_ip_prefix": "0.0.0.0/0",
        "direction": "ingress",
        "ethertype": "IPv4",
        "protocol": "tcp",
        "port_range_min": 22,
        "port_range_max": 22
    }'
To authenticate Infrahub API requests, add an authorization header to your API request that contains an API Key as follows:
-H "api_key: YOUR API KEY"
I don't have access to the SSH key associated with my virtual machine. How can I login without it?
The following instructions guide you through accessing your virtual machines without the need for an SSH key, utilizing the VNC console recovery mode. Note that these procedures are designed for Ubuntu 22 instances; details may differ for other operating systems.
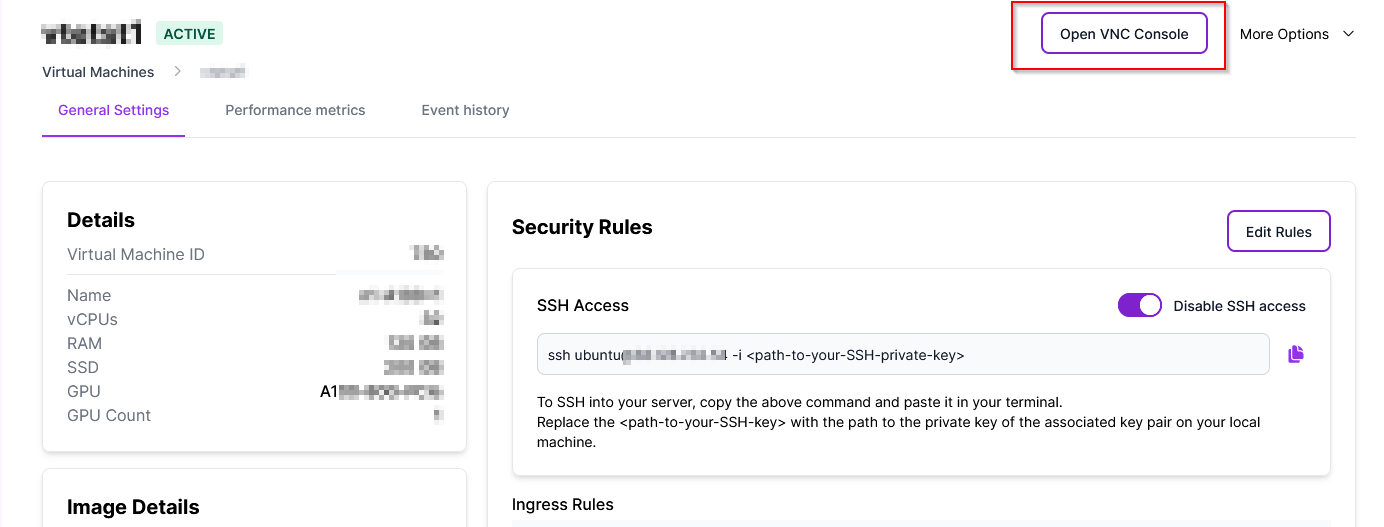
In Hyperstack, go to the "Virtual Machines" tab and click on the virtual machines "NAME" you want to access, to view its details.
Within the VM's details, click "Open VNC Console".
To access the grub menu, click the "
Send CtrlAltDel" command (found at the top right of the console), and then click on the black console window while holding the "Shift" key.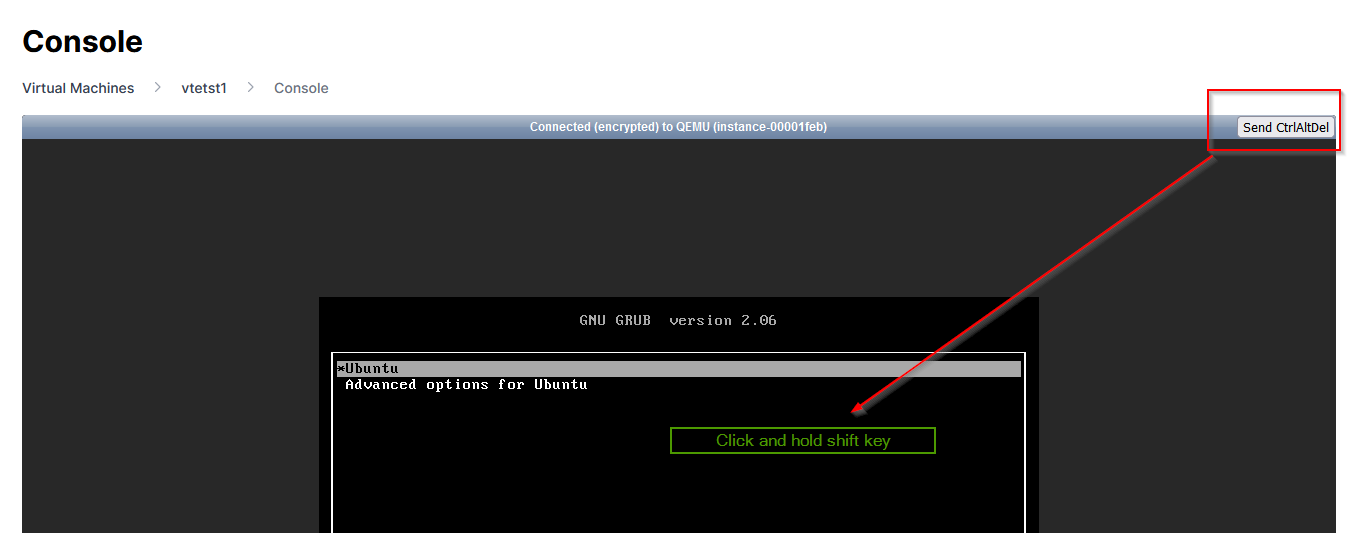
Select "
Advanced options" > "Recovery mode" from the grub menu.
Use arrow keys to navigate to the menu option labeled "
root", and press "Enter" (it may appear distorted due to console messages, this is expected).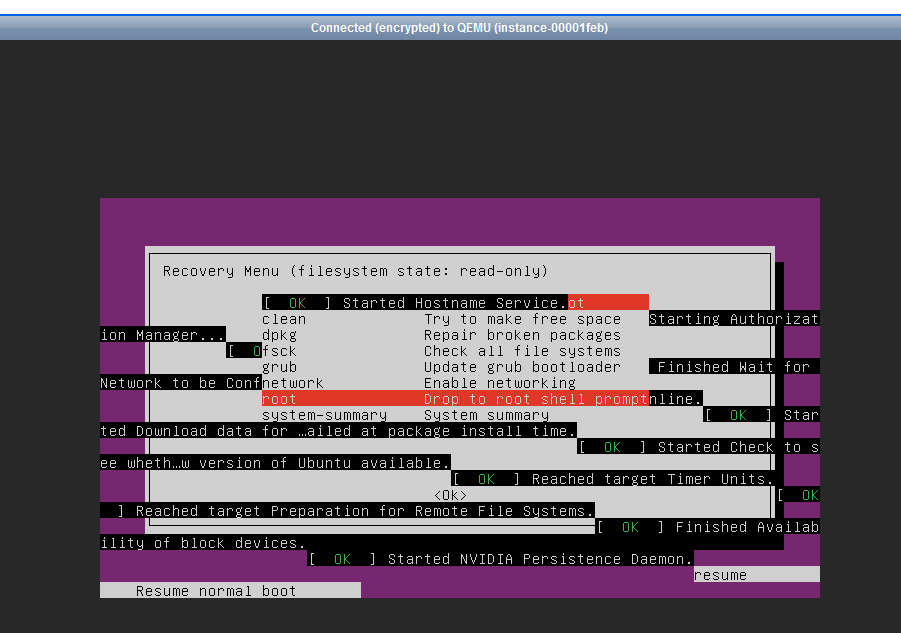
Root access to the system will be granted, allowing you to carry out administrative tasks.
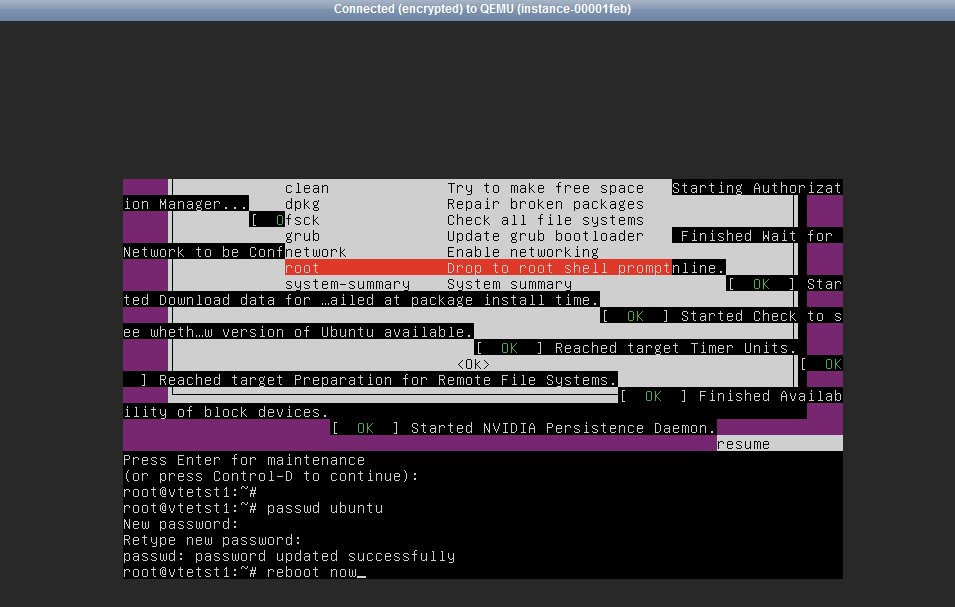
How to reset your Ubuntu password:
a. Send the "passwd" command.
b. Enter your new password twice.Execute the "
reboot now" command to restart the virtual machine, and the system changes will take effect.
Can I use a password to connect to my VMs instead of SSH keys?
Connection to a VM using a password can be achieved using a cloud-init script, outlined below:
#cloud-config
ssh_pwauth: True
chpasswd:
  list: |
     root:&92H*eMFATUB^kmEEkp
  expire: False
package_update: true
package_upgrade: true
runcmd:
sed -i -e '/^#PermitRootLogin/s/^.*$/PermitRootLogin yes/' -e '/^PermitRootLogin/s/^.*$/PermitRootLogin yes/' /etc/ssh/sshd_config
systemctl restart sshd
References:
Attempting to connect with an SSH key is leading to too many authentication failures.
For SSH access to Ubuntu virtual machines:
- Add an SSH key pair to the user Ubuntu.
- Ensure you are providing the private key matching the imported public key in Hyperstack.
For example:
- If the imported SSH key is:
.ssh/id_rsa.pub - The corresponding SSH command for connection may look similar to:
ssh -i .ssh/id_rsa ubuntu@<public-ip>
References:
How do I access my virtual machine from my local Ubuntu after adding an SSH key pair?
To gain access to your virtual machine via secure shell (SSH) execute the following command:
ssh -i /path/to/private-key os-username@your-vm-ip
- "
/path/to/private-key" is replaced with the path to the private key associated with your SSH key pair. - "
os-username" is replaced with the name of the operating system (OS) running on your virtual machine.- For Ubuntu OS the username is
ubuntu - For Centos OS the username is
centos - For Debian OS the username is
debian
- For Ubuntu OS the username is
- "
your-vm-ip" is replaced with the IP address of your virtual machine.
References:
If I don't enable the public IP address, how can I access my virtual machine?
Linux:
For virtual machines running Linux-based operating systems, setting a public IP is required because SSH key pairs must be used for login.
Windows:
For virtual machines running Windows operating systems, you need to set an administrator password through a VNC console login. However, to access your virtual machines from your local machine, a public IP address is necessary.
Specifications and configurations
How can I change the specifications of my virtual machine without losing its data/configurations?
Solutions:
If the virtual machine you want to modify was created from a bootable volume:
- The VM created from a bootable volume can be deleted without losing its data since the data is stored on the volume. Subsequently, you can create a new virtual machine from the existing bootable volume by specifying the volume's name in the
volume_namefield during VM creation or the Hyperstack UI. This allows the new VM to access the saved data on the volume and use its operating system, offering a way to change the VM's specifications without losing its data. Note that a bootable volume can only be attached to a single virtual machine at a time due to the limited support for parallel access to a single disk by most operating systems and file systems.
If the virtual machine was NOT created from a bootable volume:
Create a new bootable volume. See instructions on how to create a new bootable volume.
The new bootable volume must be attached to the virtual machine containing the custom data you wish to save. See volume attachment details.
Once the bootable volume is attached, the VM can be deleted as the data is stored on the volume.
Create a new VM with your desired specifications (flavor) from the bootable volume that contains the saved custom data.
References:
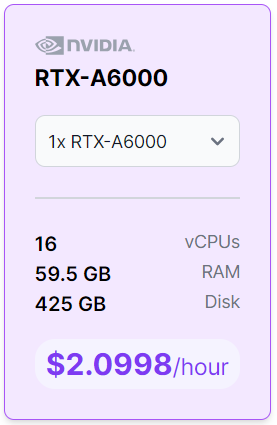
What is a flavor?
A flavor includes the GPU model, vCPUs, RAM, and system disk. Flavors provide a convenient method to choose virtual machine specifications for your specific workloads. The hourly price of a virtual machine varies depending on the specifications of the selected flavor.
Here is an example of a flavor you can choose during virtual machine creation within Hyperstack:
| Resource type | Units |
|---|---|
| RTX-A6000 graphics card | 1 |
| vCPU cores | 16 |
| RAM | 59.5 GB |
| Disk space | 425 GB |
In the near future, we will introduce the capability to create custom flavors tailored to the specific requirements of your workloads. Additionally, you will be able to modify the flavor of your existing virtual machines through a process known as resizing.
References:
States and billing
Which virtual machine states incur billing costs?
We bill only for VMs in the ACTIVE and SHUTOFF states. For HIBERNATED VMs, charges apply only to the storage and public IP addresses that remain attached during hibernation. Transitional states like HIBERNATING or RESTORING do not incur charges. Additionally, the ERROR state resulting from failed VM operations is also charge-free.
States and billing status of virtual machines
The table below details the virtual machine (VM) states, indicating whether each state results in charges.
| Power state | Description | Billing |
|---|---|---|
ACTIVE | The VM is running. This is the standard working state. | Billed |
SHUTOFF | The VM has been successfully shutdown. Billing continues for VMs in the SHUTOFF state as all resources, including vCPUs, memory, GPUs, storage, and public IP addresses, remain allocated to the VM. | Billed |
HIBERNATED | When a VM is in the HIBERNATED state, its configuration and disk data are saved, and all resources, except storage and IP addresses, are de-allocated. Billing continues only for the storage and public IP addresses that remain attached to the VM. | Partially Billed |
User-initiated states
The table below outlines the user-initiated transitional states of virtual machines. It's important to note that none of these transitional states result in charges. Additionally, the ERROR state, which occurs due to failed operations on the VM, incurs no charges.
| Power state | Description | Billing |
|---|---|---|
HIBERNATING | The VM is transitioning into a HIBERNATED state. | Not Billed |
RESTORING | The VM operating system and software are restarting from HIBERNATION and returning to an ACTIVE state. | Not Billed |
STARTING | The request to start the VM has been accepted. | Not Billed |
STOPPING | The VM is being stopped. This is the transition state between ACTIVE and SHUTOFF. | Not Billed |
REBOOTING | The VM is being restarted, simulating the process of unplugging and rebooting a physical machine. | Not Billed |
CREATING | The request to create the VM has been accepted. | Not Billed |
BUILD | The VM is being built with the specified configuration. | Not Billed |
DELETING | The VM is being deleted. | Not Billed |
ERROR | The VM is stuck in an error state. The last operation on the virtual machine was unsuccessful. | Not Billed |
References:
How do I check the billing status of my virtual machines?
You can easily check the status of your virtual machines by navigating to the Virtual Machines page in Hyperstack. This user-friendly interface offers a convenient way to view the running states of your virtual machines, as shown in the example below.
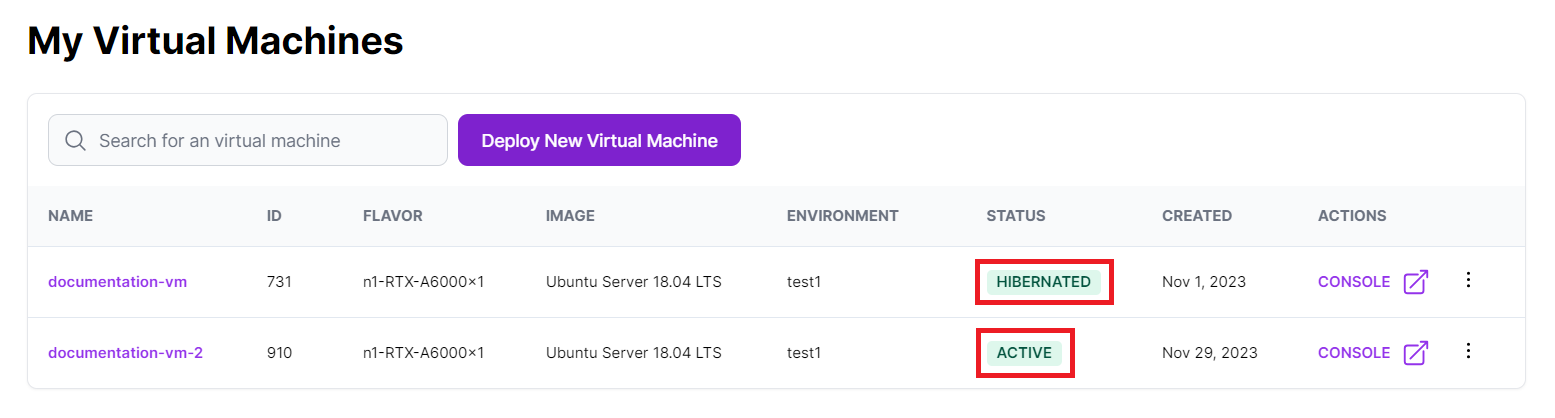
The status of your virtual machines can also be accessed through the List virtual machines Infrahub API endpoint by making a GET request to /core/virtual-machines. This API call provides detailed information about the running states of your virtual machines as, illustrated below.
curl -X GET "https://infrahub-api.nexgencloud.com/v1/core/virtual-machines" \
  -H "accept: application/json"\
  -H "api_key: YOUR API KEY"
{
    "status": true,
    "message": "Getting VMs successful",
    "instances": [
        {
            "id": 731,
            "name": "documentation-vm",
            "status": "HIBERNATED",
        },
        ...
    ]
}
The status field indicates the current running state of the virtual machine. In this example, the status is HIBERNATED, signifying that the virtual machine's state is saved, and all resources, except for storage and IP address, are de-allocated. Billing continues only for the attached storage and public IP address during the hibernation period.
References:
What is the difference between the virtual machine states SHUTOFF and HIBERNATED?
When a virtual machine is in the SHUTOFF state, billing persists as the resources it utilizes are exclusively reserved for you.
When a virtual is HIBERNATED, the current state of the VM is saved, resulting in cost savings for the temporarily unused resources. During the HIBERNATED, billing stops for all resources except for the public IP address and storage. When you RESTORE your virtual machine, you will regain access with the same resource configuration, and billing resumes for these resources.
You won't incur charges for transition states like HIBERNATING or RESTORING, and there are no charges for a VM in the ERROR state resulting from failed operations.
Click here for instructions on how to change the state of your virtual machines.
In Hyperstack, you can change the state of your virtual machines using these steps:
Go to the details page of the VM you want to modify as illustrated below, and hover your cursor over the "More Options V" dropdown in the top right corner of the window to see the VM state-changing actions available for execution on the virtual machine.
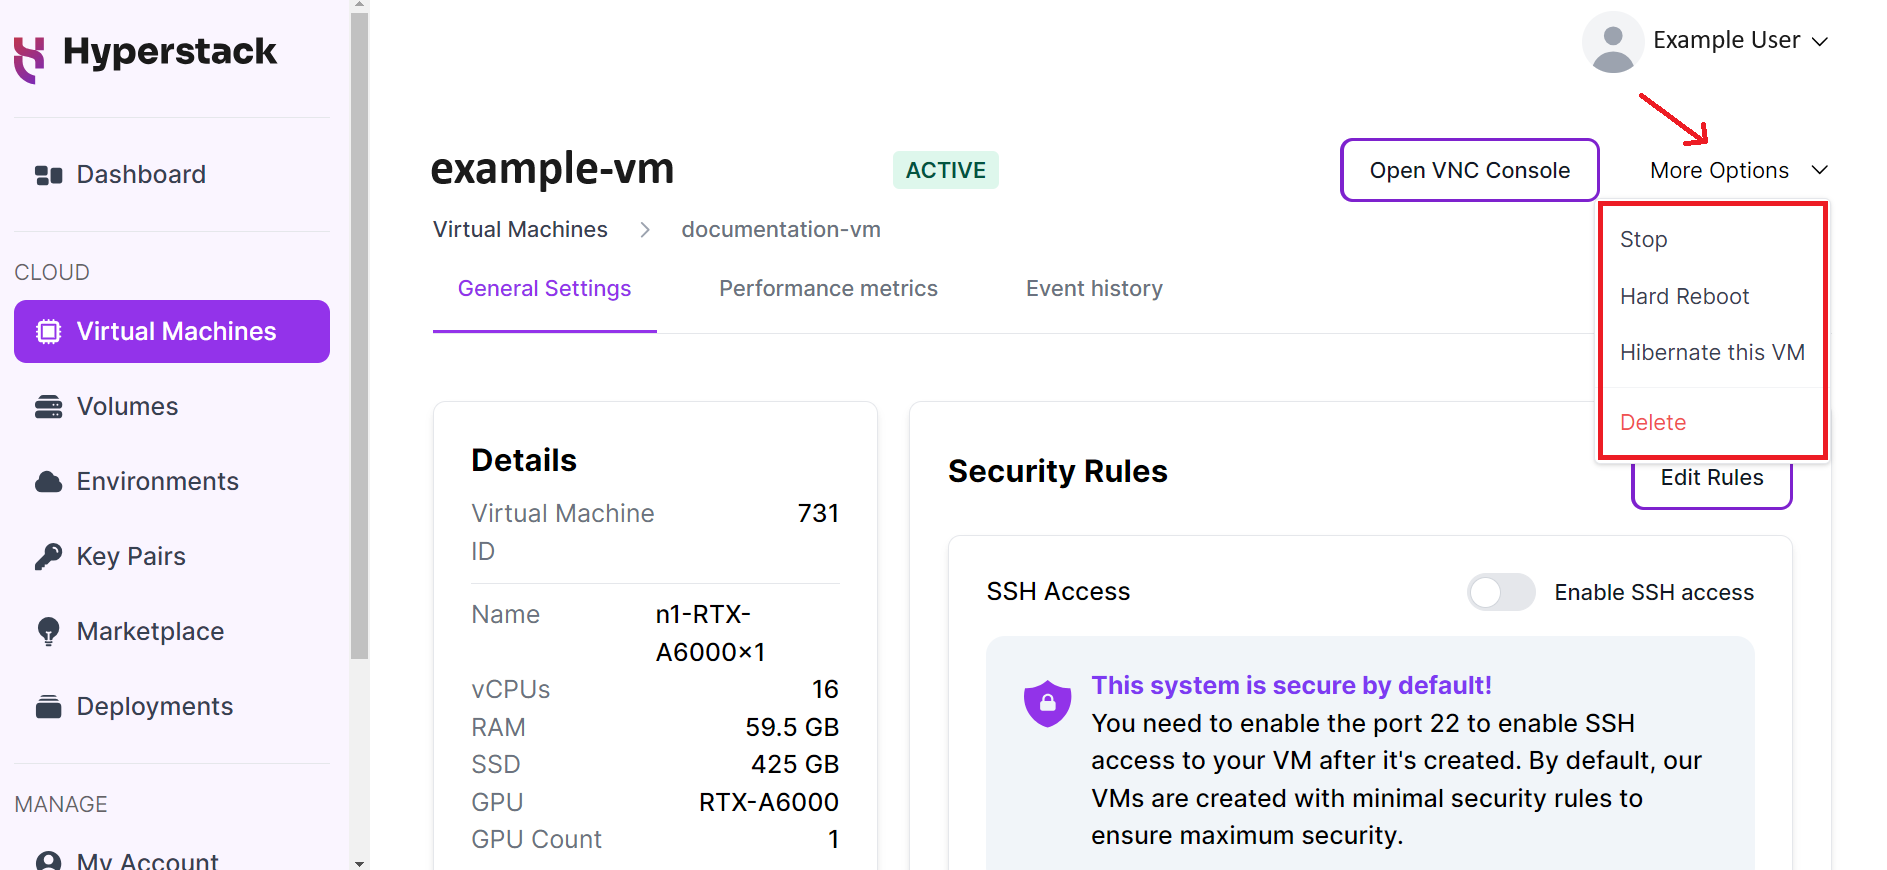
Select the VM state-changing action based on your needs.
- Stop - Transitions your virtual machine into a
SHUTOFFstate. - Hard Reboot - Restarts the virtual machine's operating system and all its running programs.
- Hibernate this VM - Transitions your virtual machine into a
HIBERNATEDstate. - Delete - Permanently deletes a virtual machine.
The transition of your virtual machine to the new state might take some time.
Changing VM state using the Infrahub API:
The Infrahub API can be used to HIBERNATE or DELETE your virtual machine, refer to the instructions available here.
To avoid data loss, before modifying your virtual machines (hibernate, resize, or delete), back up the data from the temporary storage of the current session, known as the ephemeral disk, to one or more Shared Storage Volumes (SSVs). See the instructions below:
How to save your workload data to an SSV
VM data can be stored by utilizing Shared Storage volumes (SSVs).
Create a volume either through Hyperstack, or by using the Infrahub API's "Create volume" endpoint.
Attach and mount the volume to your virtual machine, achieved either through Hyperstack or by using the "Attach volumes to virtual machine" Infrahub API endpoint.
Once the volume is attached to your virtual machine, you can proceed to move or copy the data from the ephemeral disk to the shared storage volume, saving your data.
With the data now saved on the volume, you can modify the state of the virtual machine without the risk of data loss.
References:
My virtual machine is in SHUTOFF state but I am still being charged.
When you stop a virtual machine to transition it into a SHUTOFF state, billing continues as the resources it utilizes remain exclusively reserved for you.
To stop billing costs, make sure the virtual machine is either HIBERNATED or deleted.
You won't incur charges for transition states like HIBERNATING or RESTORING, and there are no charges for a VM in the ERROR state resulting from failed operations.
How to change the state of your virtual machines within Hyperstack:
In Hyperstack, you can change the state of your virtual machines using these steps:
Go to the details page of the VM you want to modify as illustrated below, and hover your cursor over the "More Options V" dropdown in the top right corner of the window to see the VM state-changing actions available for execution on the virtual machine.
Select the VM state-changing action based on your needs.
- Stop - Transitions your virtual machine into a
SHUTOFFstate. - Hard Reboot - Restarts the operating system and all its running programs.
- Hibernate this VM - Transitions your virtual machine into a
HIBERNATEDstate. - Delete - Permanently deletes a virtual machine.
The transition of your virtual machine to the new state might take some time.
Changing VM state using the Infrahub API:
The Infrahub API can be used to HIBERNATE or DELETE your virtual machine, refer to the instructions available here.
To avoid data loss, before modifying your virtual machines (hibernate, resize, or delete), back up the data from the temporary storage of the current session, known as the ephemeral disk, to one or more Shared Storage Volumes (SSVs). See the instructions below:
How to save your workload data to an SSV
VM data can be stored by utilizing Shared Storage volumes (SSVs).
Create a volume either through Hyperstack, or by using the Infrahub API's "Create volume" endpoint.
Attach and mount the volume to your virtual machine, achieved either through Hyperstack or by using the "Attach volumes to virtual machine" Infrahub API endpoint.
Once the volume is attached to your virtual machine, you can proceed to move or copy the data from the ephemeral disk to the shared storage volume, saving your data.
With the data now saved on the volume, you can modify the state of the virtual machine without the risk of data loss.
References:
I shutdown a virtual machine manually, but the current state is not accurately reflected in the Hyperstack dashboard.
The use of the VM "Shutdown now" option is currently resulting in this unintended behavior. The VM was expected to shut down and update the Dashboard with its new status, but this communication did not occur. Consequently, it became stuck in the "stopping" state even though it was already shut off. To resolve this, we manually update the status on your dashboard to accurately reflect the current state.
We are actively working towards a resolution for this issue.
References:
Operating systems and drivers
What are the Nvidia and CUDA driver requirements for my virtual machine?
The following table outlines the operating system, CUDA version, and Nvidia driver compatibility for the GPUs offered by NexGen Cloud. The requirements vary based on the GPU of your virtual machine.
| GPU | Operating system | CUDA version | Nvidia drivers |
|---|---|---|---|
| H100 | Ubuntu: 20.04/22.04 Windows: 10/11 Pro, Server 2019/2020 | 12.x or later | Linux: R535 or later Windows: R535 or later |
| A100 | Ubuntu: 20.04/22.04 Windows: 10/11 Pro, Server 2019/2020 | 11.x or later | Linux: R535 or later Windows: R535 or later |
| RTX (A-4000, A-5000, A-6000, 6000-ada) | Ubuntu: 20.04/22.04 Windows: 10/11 Pro, Server 2019/2020 | 11.x or later | Linux: R535 or later Windows: R535 U8 or later |
| L40 | Ubuntu: 20.04/22.04 Windows: 10/11 Pro, Server 2019/2020 | 11.x or later | Linux: R525 or later Windows: R525 or later |
For Linux-based virtual machines, Ubuntu versions 20.04 or 22.04 must be used with the H100 GPU.
References:
How do I automatically install the latest Nvidia drivers on my virtual machine?
To automatically install Nvidia drivers on Linux-based virtual machines:
- Hyperstack
- Infrahub API
In Hyperstack navigate to the When Deploy Virtual Machine page.
Select the configuration and features of your virtual machine including a flavor, image, SSH key pair, and name for your VM.
Click the option to Auto-install Nvidia drivers.
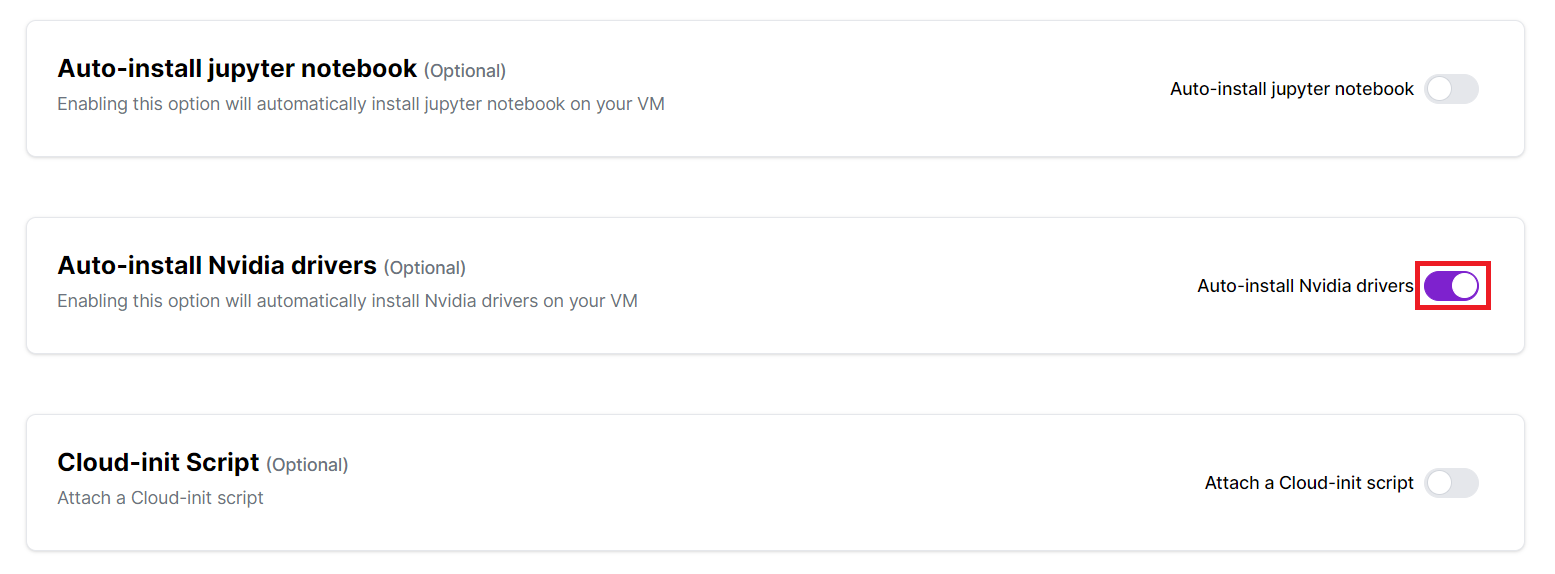
Click Deploy to create your virtual machine with automatically installed Nvidia drivers.
Include the following cloud-init script within the user_data field of the request body when creating a new virtual machine using the Infrahub API.
#cloud-config
write_files:
  - path: /tmp/download_and_run_script_nvidia.sh
    permissions: '0755'
    content: |
      #!/bin/bash
      set -e

      # Download the script
      echo "Downloading the init script..."
      SCRIPT_URL="https://api.nexgencloud.com:8080/public/nvidia/installer_script_main.sh"
      SCRIPT_NAME=$(basename "\${SCRIPT_URL}")

      # Use wget if available, otherwise use curl
      if command -v wget >/dev/null 2>&1; then
          wget -O "/tmp/\${SCRIPT_NAME}" "\${SCRIPT_URL}"
      else
          curl -o "/tmp/\${SCRIPT_NAME}" "\${SCRIPT_URL}"
      fi

      # Make the downloaded script executable
      chmod +x "/tmp/\${SCRIPT_NAME}"
      echo "Running the init script..."
      /tmp/\${SCRIPT_NAME}

runcmd:
  - /tmp/download_and_run_script_nvidia.sh
  - [ shutdown, -r, now ]
References:
nvidia-smi is returning "NVML: Driver/library version mismatch".
Symptoms:
Failed to initialize NVML: driver/library version mismatch
root@instance-1:/var/log/apt# nvidia-smi` `Failed to initialize NVML: Driver/library version mismatch
NVML library version: 535.113
- This is caused by a version mismatch between the NVIDIA GPU driver and the NVML library.
NVRM: API mismatch
NVRM: API mismatch: the client has the version 535.113.01, but
this kernel module has the version 535.104.12.
- API mismatch between the NVIDIA GPU driver and the client.
Cause of issue:
This mismatch is caused by automatic updates installed on a new driver version.
Diagnostic Commands
grep NVRM /var/log/syslog
dpkg -l |egrep "cuda|nvidia" -i
dkms status
- These commands gather information about the NVIDIA drivers, kernel modules, and related packages on the system, helpful for troubleshooting.
Solution:
We suggest turning off automatically installed updates. To do this on Ubuntu machines, execute
sudo dpkg-reconfigure unattended-upgradesand choose "no" when prompted.Execute the following commands to re-install Nvidia-driver, and libraries, and reboot the instance.
sudo apt purge nvidia* libnvidia*

# Update the version number 535 to the correct version, usually the driver version reported in the logs.
sudo apt install nvidia-driver-535

reboot now
the
nvidia-smicommand again, it should now work.If you receive this error:
NVIDIA-SMI has failed because it couldn't communicate with the NVIDIA driver. Make sure that the latest NVIDIA driver is installed and runningExecute the following commands to re-install CUDA libraries and reboot again.
sudo apt-get update
sudo apt-get -y install cuda
reboot now
Internet accessibility
I'm experiencing complete packet loss when attempting to ping the public IP associated with a virtual machine.
To solve this issue, create a firewall Rule through the Infrahub API that permits incoming ICMP (ping) traffic from any IP address for your virtual machine.
Follow these steps:
Create a new API key or copy your existing API key. For additional information on accessing your API key, click here.
In Hyperstack, navigate to the virtual machines report (2nd menu option) and copy the ID field of the VM for which you are creating a firewall rule.
Execute the following command in a terminal, replacing
<VM-ID>with the virtual machine ID and<API-KEY>with your API key.
curl 'https://infrahub-api.nexgencloud.com/core/virtual-machines/<VM-ID>/sg-rules' -X POST \
    -H 'api-key: <API-KEY>' \
    --data-raw '{
        "remote_ip_prefix":"0.0.0.0/0",
        "direction":"ingress",
        "ethertype":"IPv4",
        "protocol":"icmp"
    }'
You can share the necessary <VM-ID> values with us, granting authorization to carry out these actions on your behalf.
This issue is currently under investigation, and we anticipate it will be resolved in an upcoming release.
References:
Network and security
How do I create a Firewall Rule for my virtual machine?
To secure your resources, create firewall rules to specify which ports are open to the public for both incoming and outgoing traffic, and define the permitted IP addresses.
Firewall rules for your virtual machines can be created using two different methods: the Hyperstack platform and the Infrahub API.
When working with the Hyperstack platform, you can easily set up firewall rules that are based on the three most commonly used internet protocols: TCP (Transmission Control Protocol), UDP (User Datagram Protocol), and ICMP (Internet Control Message Protocol). These protocols cover many basic use cases.
However, if your requirements involve more advanced protocols, you will need to use the Infrahub API. The Infrahub API enables you to create firewall rules based on an extensive list of protocols, catering to your unique networking needs.
How to create a firewall rule within Hyperstack
The example below demonstrates how to create a firewall rule that allows all incoming traffic on port 80 (HTTP) from any IP address to your virtual machine:
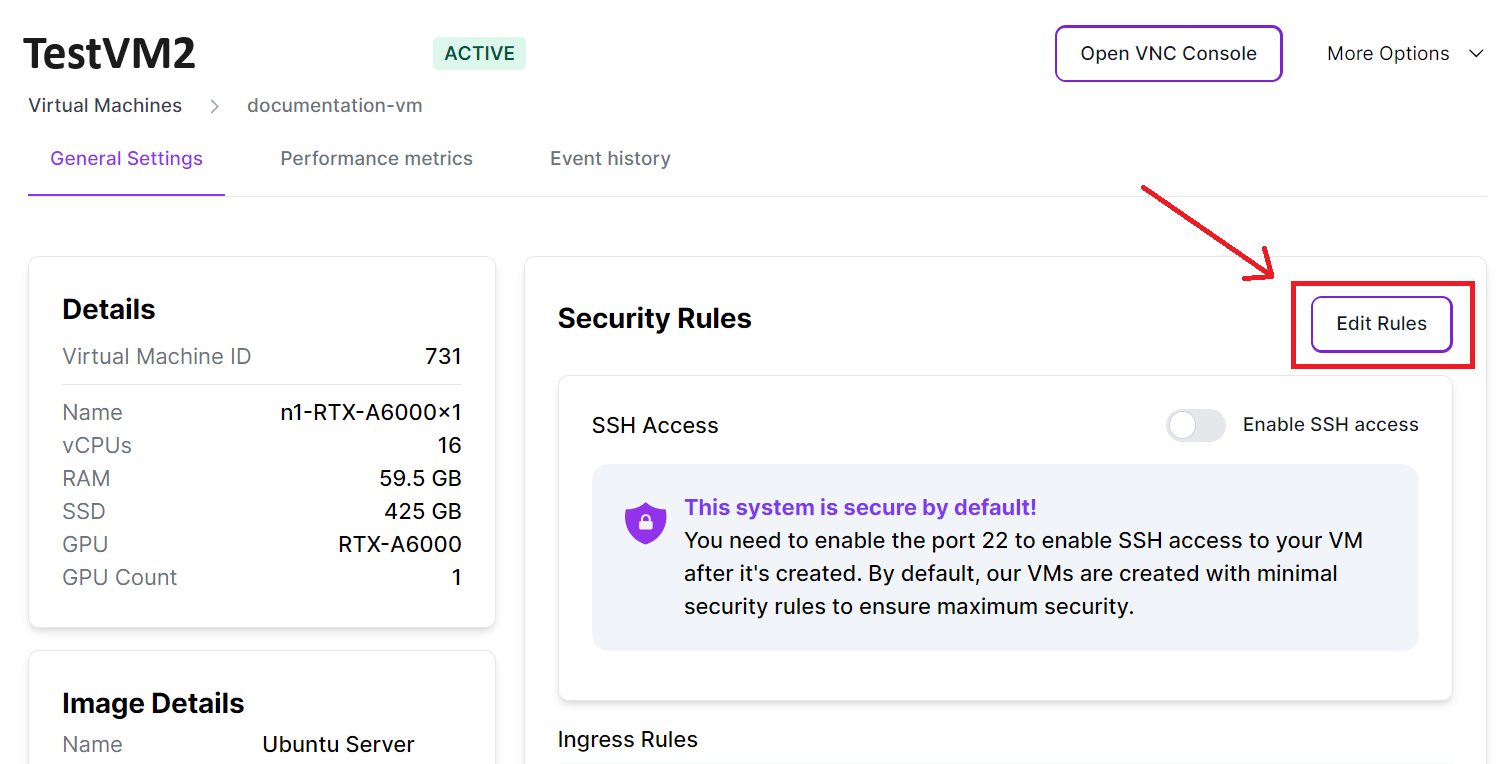
Click "Edit Rules" in the "Firewall Rules" section of your virtual machine, to manage its firewall rules.
Click "Add New Inbound Rule" to create a firewall rule that will allow incoming traffic.

Complete the following firewall rule fields, to enable incoming traffic on port 80.

Field Name Field Input ETHER TYPE Leave as default (usually IPv4) PROTOCOL Select "tcp" (Transmission Control Protocol) PORT RANGE Set the port range to "80". Port 80 is the standard port used for HTTP requests. REMOTE IP PREFIX Use "0.0.0.0/0" to allow traffic from any source IP address. Click "Add", to create a firewall rule enabling incoming traffic.
References:
How can I configure my virtual machine to permit unrestricted incoming and outgoing traffic?
To enable all incoming and outgoing traffic for your virtual machine, configure firewall rules to permit inbound and outbound traffic on all ports and IP addresses.
Firewall rules for your virtual machines can be created using two different methods: the Hyperstack platform and Infrahub API.
Hyperstack - How to create firewall rules to permit unrestricted incoming and outgoing traffic.
These instructions guide you through the process of creating firewall rules that allow all incoming traffic from any port and any IP address to your virtual machine using the Hyperstack platform:
Within Hyperstack, click "Edit Rules" in the "Firewall Rules" section of your virtual machine, to manage its firewall rules.
Click "Add New Inbound Rule" to create a firewall rule for incoming traffic.
Complete the fields as specified below to enable all incoming traffic on all ports from any IP address.
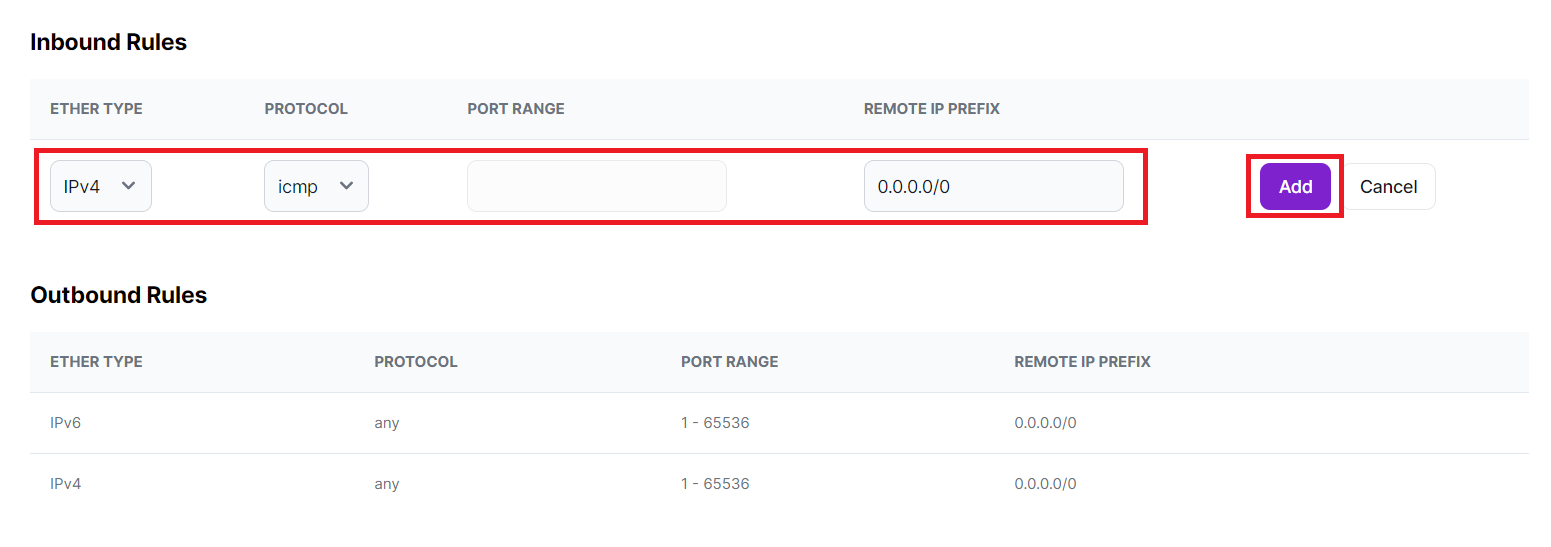
Field Name Field Input ETHER TYPE Leave as default (usually IPv4) PROTOCOL Select "icmp" (Internet Control Message Protocol) PORT RANGE This field is left empty, permitting traffic from all ports. REMOTE IP PREFIX Use "0.0.0.0/0" to allow traffic from any source IP address. Click "Add", to create a firewall rule enabling all incoming traffic.
Now that you've created a firewall rule allowing all incoming traffic, follow the same steps to establish a rule for outgoing traffic. Click "Add New Outbound Rule" to configure a firewall rule for outgoing traffic.
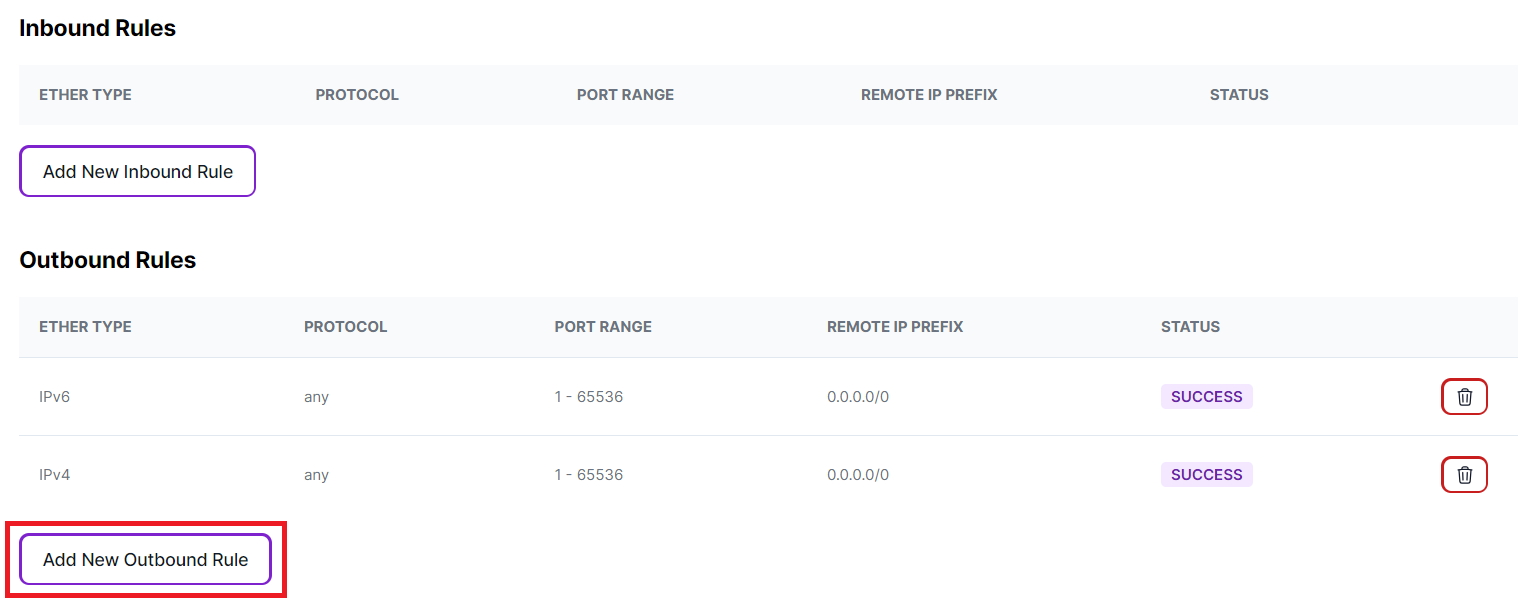
Complete the fields as specified below to enable all outgoing traffic on all ports to any IP address.
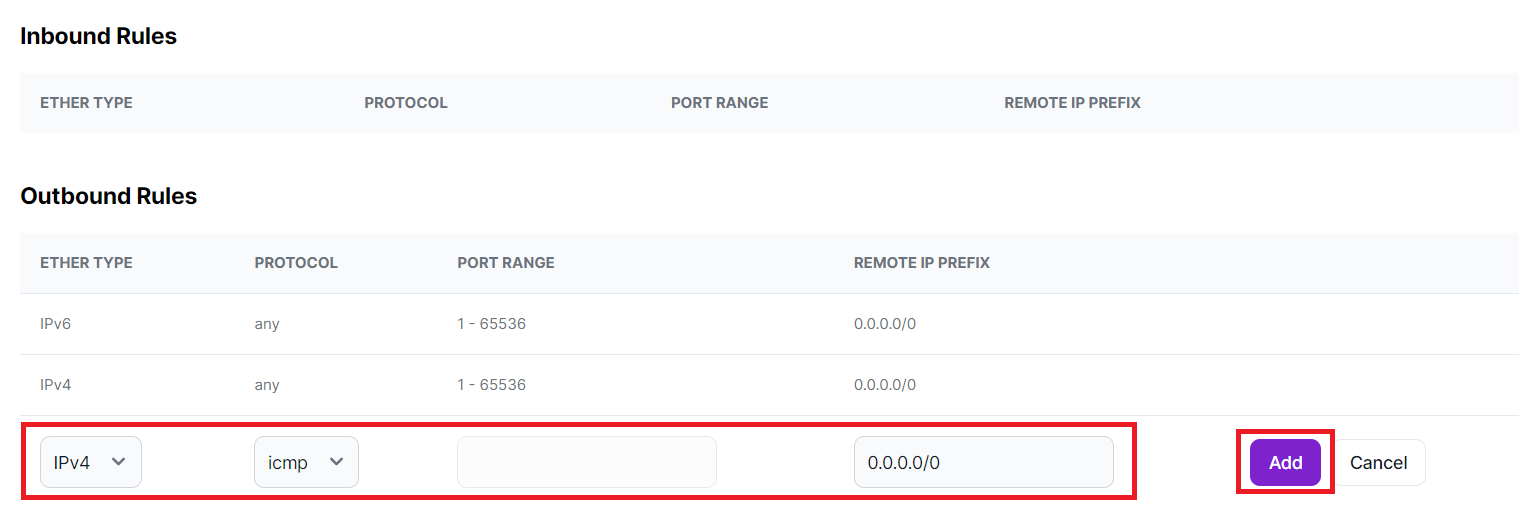
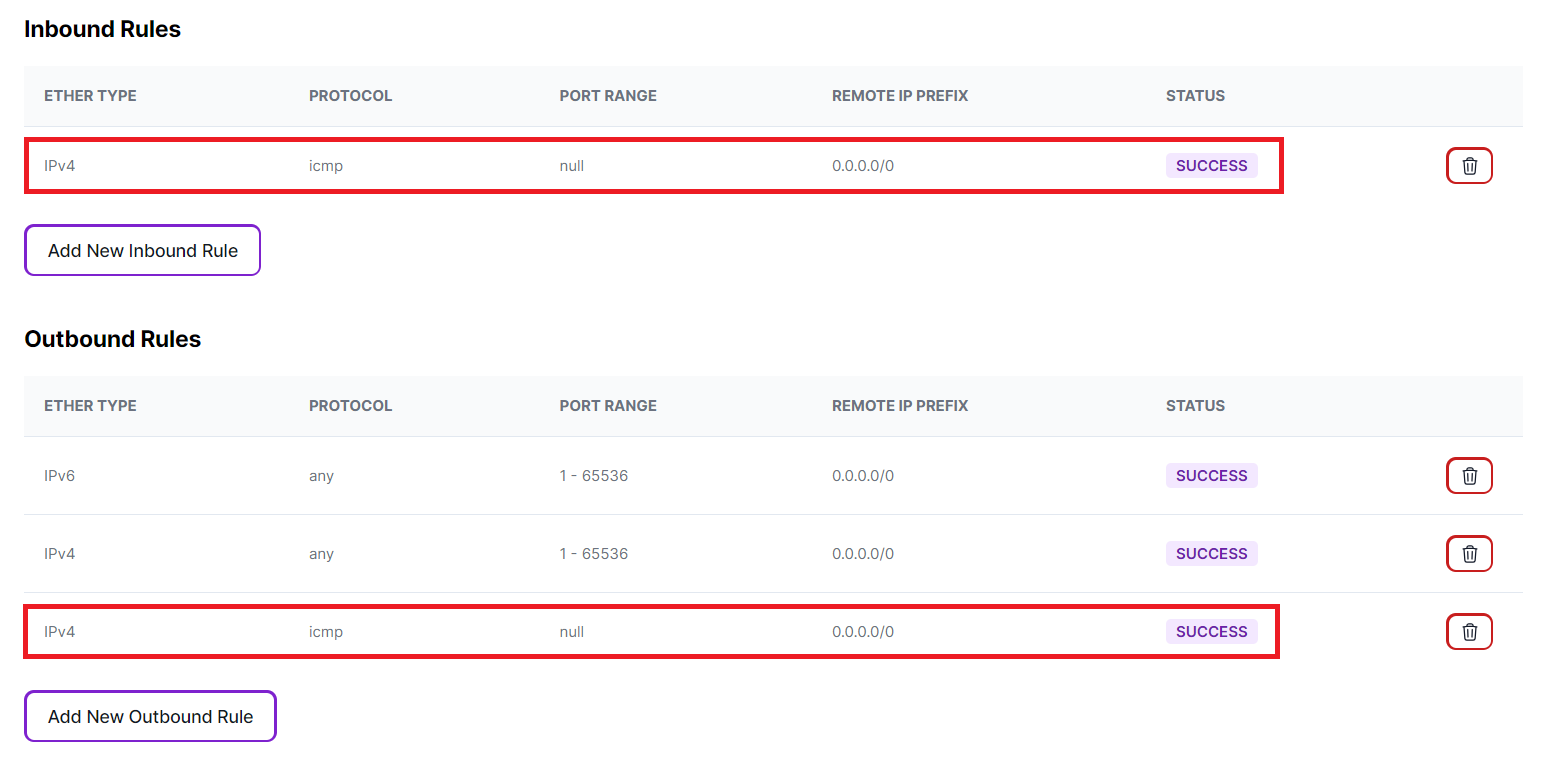
Field Name Field Input ETHER TYPE Leave as default (usually IPv4) PROTOCOL Select "icmp" (Internet Control Message Protocol) PORT RANGE This field is left empty, permitting traffic to all ports. REMOTE IP PREFIX Use "0.0.0.0/0" to allow traffic to any IP address. Your inbound and outbound firewall rules should appear as follows:
Infrahub API - How to create firewall rules to permit unrestricted incoming and outgoing traffic.
These instructions walk you through the process of creating firewall rules that allow all incoming and outgoing traffic from any port and any IP address to your virtual machine using the Infrahub API.
1. Create an inbound rule via the Infrahub API
Path parameters
Include the integer ID of the virtual machine that this firewall rule is being attached to in the path of the request as follows:
/core/virtual-machines/{VM ID HERE}/sg-rules
Request body parameters
Complete the request body with the following fields and values.
| Field Name | Field Input |
|---|---|
direction | "ingress" to designate that the firewall rule is for incoming traffic. |
protocol | Select "icmp" (Internet Control Message Protocol). |
ethertype | "IPv4". |
remote_ip_prefix | Use "0.0.0.0/0" to allow traffic from any source IP address. |
curl -X POST "https://infrahub-api.nexgencloud.com/v1/core/virtual-machines/123/sg-rules" \
-H "accept: application/json"\
-H "content-type: application/json" \
-H "api_key: YOUR API KEY" \
-d '{
  "direction": "ingress",
  "protocol": "icmp",
  "ethertype": "IPv4",
  "remote_ip_prefix": "0.0.0.0/0"
}'
To authenticate Infrahub API requests, add an authorization header to your API request that contains an API Key as follows:
-H "api_key: YOUR API KEY"
Returns
Returns the status of the firewall rule creation operation, along with the configuration details that were specified in the request body.
This response indicates the successful addition of a firewall rule that will permit all incoming traffic (ingress) from all ports, using the ICMP protocol and Ethernet type "IPv4" for the virtual machine with the ID "123".
{
    "status": true,
    "message": "Security Rule created successfully",
    "security_rule": {
        "id": 2296,
        "direction": "ingress",
        "protocol": "icmp",
        "port_range_min": null,
        "port_range_max": null,
        "ethertype": "IPv4",
        "remote_ip_prefix": "0.0.0.0/0",
        "status": "pending",
        "created_at": "2023-11-24T19:59:01"
    }
}
2. Create an outbound rule via the Infrahub API
Path parameters
Include the integer ID of the virtual machine that this firewall rule is being attached to in the path of the request as follows: /core/virtual-machines/{VM ID HERE}/sg-rules
Request body parameters
Complete the request body with the following fields and values.
| Field Name | Field Input |
|---|---|
direction | "egress" to designate that the firewall rule is for outgoing traffic. |
protocol | Select "icmp" (Internet Control Message Protocol). |
ethertype | "IPv4". |
remote_ip_prefix | Use "0.0.0.0/0" to allow traffic to any IP address. |
curl -X POST "https://infrahub-api.nexgencloud.com/v1/core/virtual-machines/123/sg-rules" \
-H "accept: application/json"\
-H "content-type: application/json" \
-H "api_key: YOUR API KEY" \
-d '{
  "direction": "egress",
  "protocol": "icmp",
  "ethertype": "IPv4",
  "remote_ip_prefix": "0.0.0.0/0"
}'
Returns
Returns the status of the firewall rule creation operation, along with the configuration details that were specified in the request body.
This response indicates the successful addition of a firewall rule that will permit all outgoing traffic (egress) to all ports, using the ICMP protocol and Ethernet type "IPv4" for the virtual machine with the ID "123".
{
    "status": true,
    "message": "Security Rule created successfully",
    "security_rule": {
        "id": 2297,
        "direction": "egress",
        "protocol": "icmp",
        "port_range_min": null,
        "port_range_max": null,
        "ethertype": "IPv4",
        "remote_ip_prefix": "0.0.0.0/0",
        "status": "pending",
        "created_at": "2023-11-24T20:33:46"
    }
}
Keep in mind that allowing all traffic might pose firewall risks, so use this configuration carefully and consider the specific requirements of your use case.
References:
Can I increase the network throughput between my virtual machines?
The Maximum Transmission Unit (MTU) setting determines the maximum amount of data transmitted with a single Ethernet frame. Our network MTU currently supports a network throughput of approximately 10 Gbps between VMs.
Soon, we will be adding the option to create a network with jumbo frame during environment creation. This jumbo frame network will have an increased MTU size, enabling higher network throughput between virtual machines running within this environment.
References:
GPU Utilization
How do I monitor GPU utilization for my virtual machine?
To monitor GPU usage for your virtual machine while your workflows are running, execute the nvidia-smi command in the Ubuntu terminal.
References:
Infrastructure
Data centers
What certifications do NexGen Cloud data centers hold?
NexGen Cloud prioritizes the firewall and dependability of its infrastructure by housing data in data centers certified as Tier 3. These centers adhere to stringent guidelines for power redundancy, cooling, and system backups. Our data centers are concurrently maintainable, allowing for maintenance without service interruptions and maintaining an uptime of 99.982% annually.
Additionally, our data centers undergo independent audits and hold SOC 2 Type II certification. This certification validates the implementation of robust controls for firewall, availability, processing integrity, confidentiality, and privacy of data.
References:
Data management and volumes
Data transfer
How can I transfer data between virtual machines?
In the potential solutions listed below, make sure that the VM you plan to transfer data to is located in the same environment as the VM you are transferring data from. This is important because data transfer is restricted to virtual machines within the same environment.
It's important to note that a volume can only be attached to a single virtual machine at a time due to the lack of support for parallel access to a single disk by most operating systems and file systems.
Possible solutions:
Volume attachment
VM data can be stored and transferred by utilizing one or more Shared Storage volumes (SSVs).
Create a volume either through Hyperstack, or by using the Infrahub API's "Create volume" endpoint.
Attach and mount the volume to your virtual machine, achieved either through Hyperstack or by using the "Attach volumes to virtual machine" Infrahub API endpoint.
Once the volume is attached to your virtual machine, you can proceed to move or copy the data from the ephemeral disk to the SSV, saving your data.
After the volume has successfully stored the data from the ephemeral disk, you can detach it from the virtual machine.
Finally, you can now attach this volume to any new VM within the same environment for data transfer.
Bootable volumes
In cases where you wish to maintain the same operating system on the VM you are transferring data to, we recommend creating a bootable volume which is an SSV with an operating system image installed.
Data transfer tools
Create the new virtual machine that you wish to transfer files to in the same environment as your existing VM, and transfer your data through Secure Shell - Secure Copy Protocol (SSH-SCP), Rsync, Network File System (NFS) or any other similar tool.
References:
Volumes
Can I attach a single volume to multiple virtual machines?
A volume can only be attached to a single virtual machine at a time due to the lack of support for parallel access to a single disk by most operating systems and file systems.
However, NFS sharing can be used to share a single volume between multiple virtual machines.
Follow these steps:
Create a bootable volume with sufficient storage capacity for all your data.
Create a CPU-only virtual machine configuration from the volume in step 1 to serve as an NFS server.
Use a cloud-init script to install packages and enable NFS sharing.
Click here to see an example NFS server cloud-init script.
Note: "/data/nfshare" and "*(rw,no_root_squash)" should be edited according to the required behavior.NFS server script#cloud-config
packages:
- nfs-kernel-server
package_update: true
runcmd:
- mkdir -p /data/nfshare
- echo "/data/nfshare *(rw,no_root_squash)" >> /etc/exports
- exportfs -ravsClick here to see an example NFS client cloud-init script.
Note: "
10.0.0.128:/data/nfshare" and "/mnt" must be changed according to the required behavior.NFS client script#cloud-config
packages:
- nfs-common
package_update: true
mounts:
- [ "10.0.0.128:/data/nfshare", "/mnt", "nfs", "defaults", "0","0" ]
runcmd:
- mount /mntCreate a firewall rule to permit traffic to port 2049/TCP on your local subnet (eg: 10.1.1.0/24).
Create one or more VMs with your desired configurations and attach the cloud-init NFS clients example script.
Optionally, the client configurations can be saved as a Provisioning Profile for future usage.
References:
How can I save my virtual machines, similar to the process of creating an AWS machine image?
Currently, Hyperstack doesn't support volume snapshots or backup features.
Solutions:
- Currently, a possible solution could be to employ a cloud-init script and save a Provisioning Profile (The last option on the VM creation page in Hyperstack) for future VM creations.
- Shared Storage volumes are available for persistent data storage; however, please note that these volumes can only be attached to a single VM at any given time.
References:
What is a bootable volume?
A bootable volume is a Shared Storage Volume (SSV) with an operating system image pre-installed. If a virtual machine is created from a bootable volume, it can access the data saved on the volume and use its operating system. It's important to note that a bootable volume can only be attached to a single virtual machine at a time due to the lack of support for parallel access to a single disk by most operating systems and file systems.
References:
Key concepts and terminology
Hyperstack concepts and terminology
What is the relationship between Hyperstack and Infrahub API?
The Hyperstack platform operates on the Infrahub API. Its core functionalities are carried out through the Infrahub API, with Hyperstack serving as a user-friendly interface to interact with the powerful capabilities of the API.
What are regions and environments, and how do they relate to each other?
A region represents a distinct geographic location housing a data center. Regions provide the flexibility to host your resources in various global locations. Each region is intentionally isolated from others, enhancing redundancy and stability.
Environments are predefined user spaces that are created within a region, offering a logical way to organize your resources. All your resources, including SSH key pairs, virtual machines, volumes, etc., are created within a designated environment.
References:
What is an organization?
The Infrahub organization feature is designed to efficiently organize your team members and their access to resources. When you sign up for an Infrahub account, you automatically become the owner of an organization in your name. Ownership allows you to invite other team members to join your organization. You can then grant permissions to other organization members, allowing them to create and manage resources within your organization. You can manage resource access for team members using the Role-Based Access Control (RBAC) system which allows you to grant specific access permissions for each resource.
References:
What is a flavor?
A flavor includes the GPU model, vCPUs, RAM, and system disk. Flavors provide a convenient method to choose virtual machine specifications for your specific workloads. The hourly price of a virtual machine varies depending on the specifications of the selected flavor.
Here is an example of a flavor you can choose during virtual machine creation within Hyperstack:
| Resource type | Units |
|---|---|
| RTX-A6000 graphics card | 1 |
| vCPU cores | 16 |
| RAM | 59.5 GB |
| Disk space | 425 GB |
In the near future, we will introduce the capability to create custom flavors tailored to the specific requirements of your workloads. Additionally, you will be able to modify the flavor of your existing virtual machines through a process known as resizing.
References:
What is a bootable volume?
A bootable volume is a Shared Storage Volume (SSV) with an operating system image pre-installed. If a virtual machine is created from a bootable volume, it can access the data saved on the volume and use its operating system. It's important to note that a bootable volume can only be attached to a single virtual machine at a time due to the lack of support for parallel access to a single disk by most operating systems and file systems.
References:
What is a firewall rule?
Firewall rules allow you to specify which ports are open to the public for both incoming and outgoing traffic, and define the permitted IP addresses, enabling you to secure your resources.
References: