Connecting to a Windows VM via RDP
You can connect to a Hyperstack virtual machine running Windows using the Remote Desktop Protocol (RDP). RDP provides a graphical interface for remote connections, making it ideal for Windows environments where users require access to a GUI. Secure Shell (SSH), on the other hand, offers command-line access and is commonly used for Unix-based systems. This article provides instructions on how to connect to a Windows VM via RDP from a Windows, Mac, or Linux machine.
Prerequisites for RDP connection:
- Verify your VM is running: On the 'My Virtual Machines' page in Hyperstack, ensure the VM is displaying an
ACTIVEstatus. It may take some time for all services to initialize after the VM is deployed. If there is a connection error, retry after a few minutes. If you have not yet created a virtual machine, follow our getting started guide for instructions.
In case you select a Windows OS Image, or a Custom Image for your new VM, you can enable the RDP Access by default when deploying.

- Ensure your VM has a public IP address: To check if your VM has a public IP address, go to the 'Virtual Machines' section in Hyperstack to open the 'My Virtual Machines' page.
- If an IP address is listed under the Public IP header, then your VM has a public IP.
- If no IP address is listed, navigate to the Networking tab on the VM's details page and toggle Public IP Attached to assign one.
1. Setup your Windows VM to enable network connectivity
-
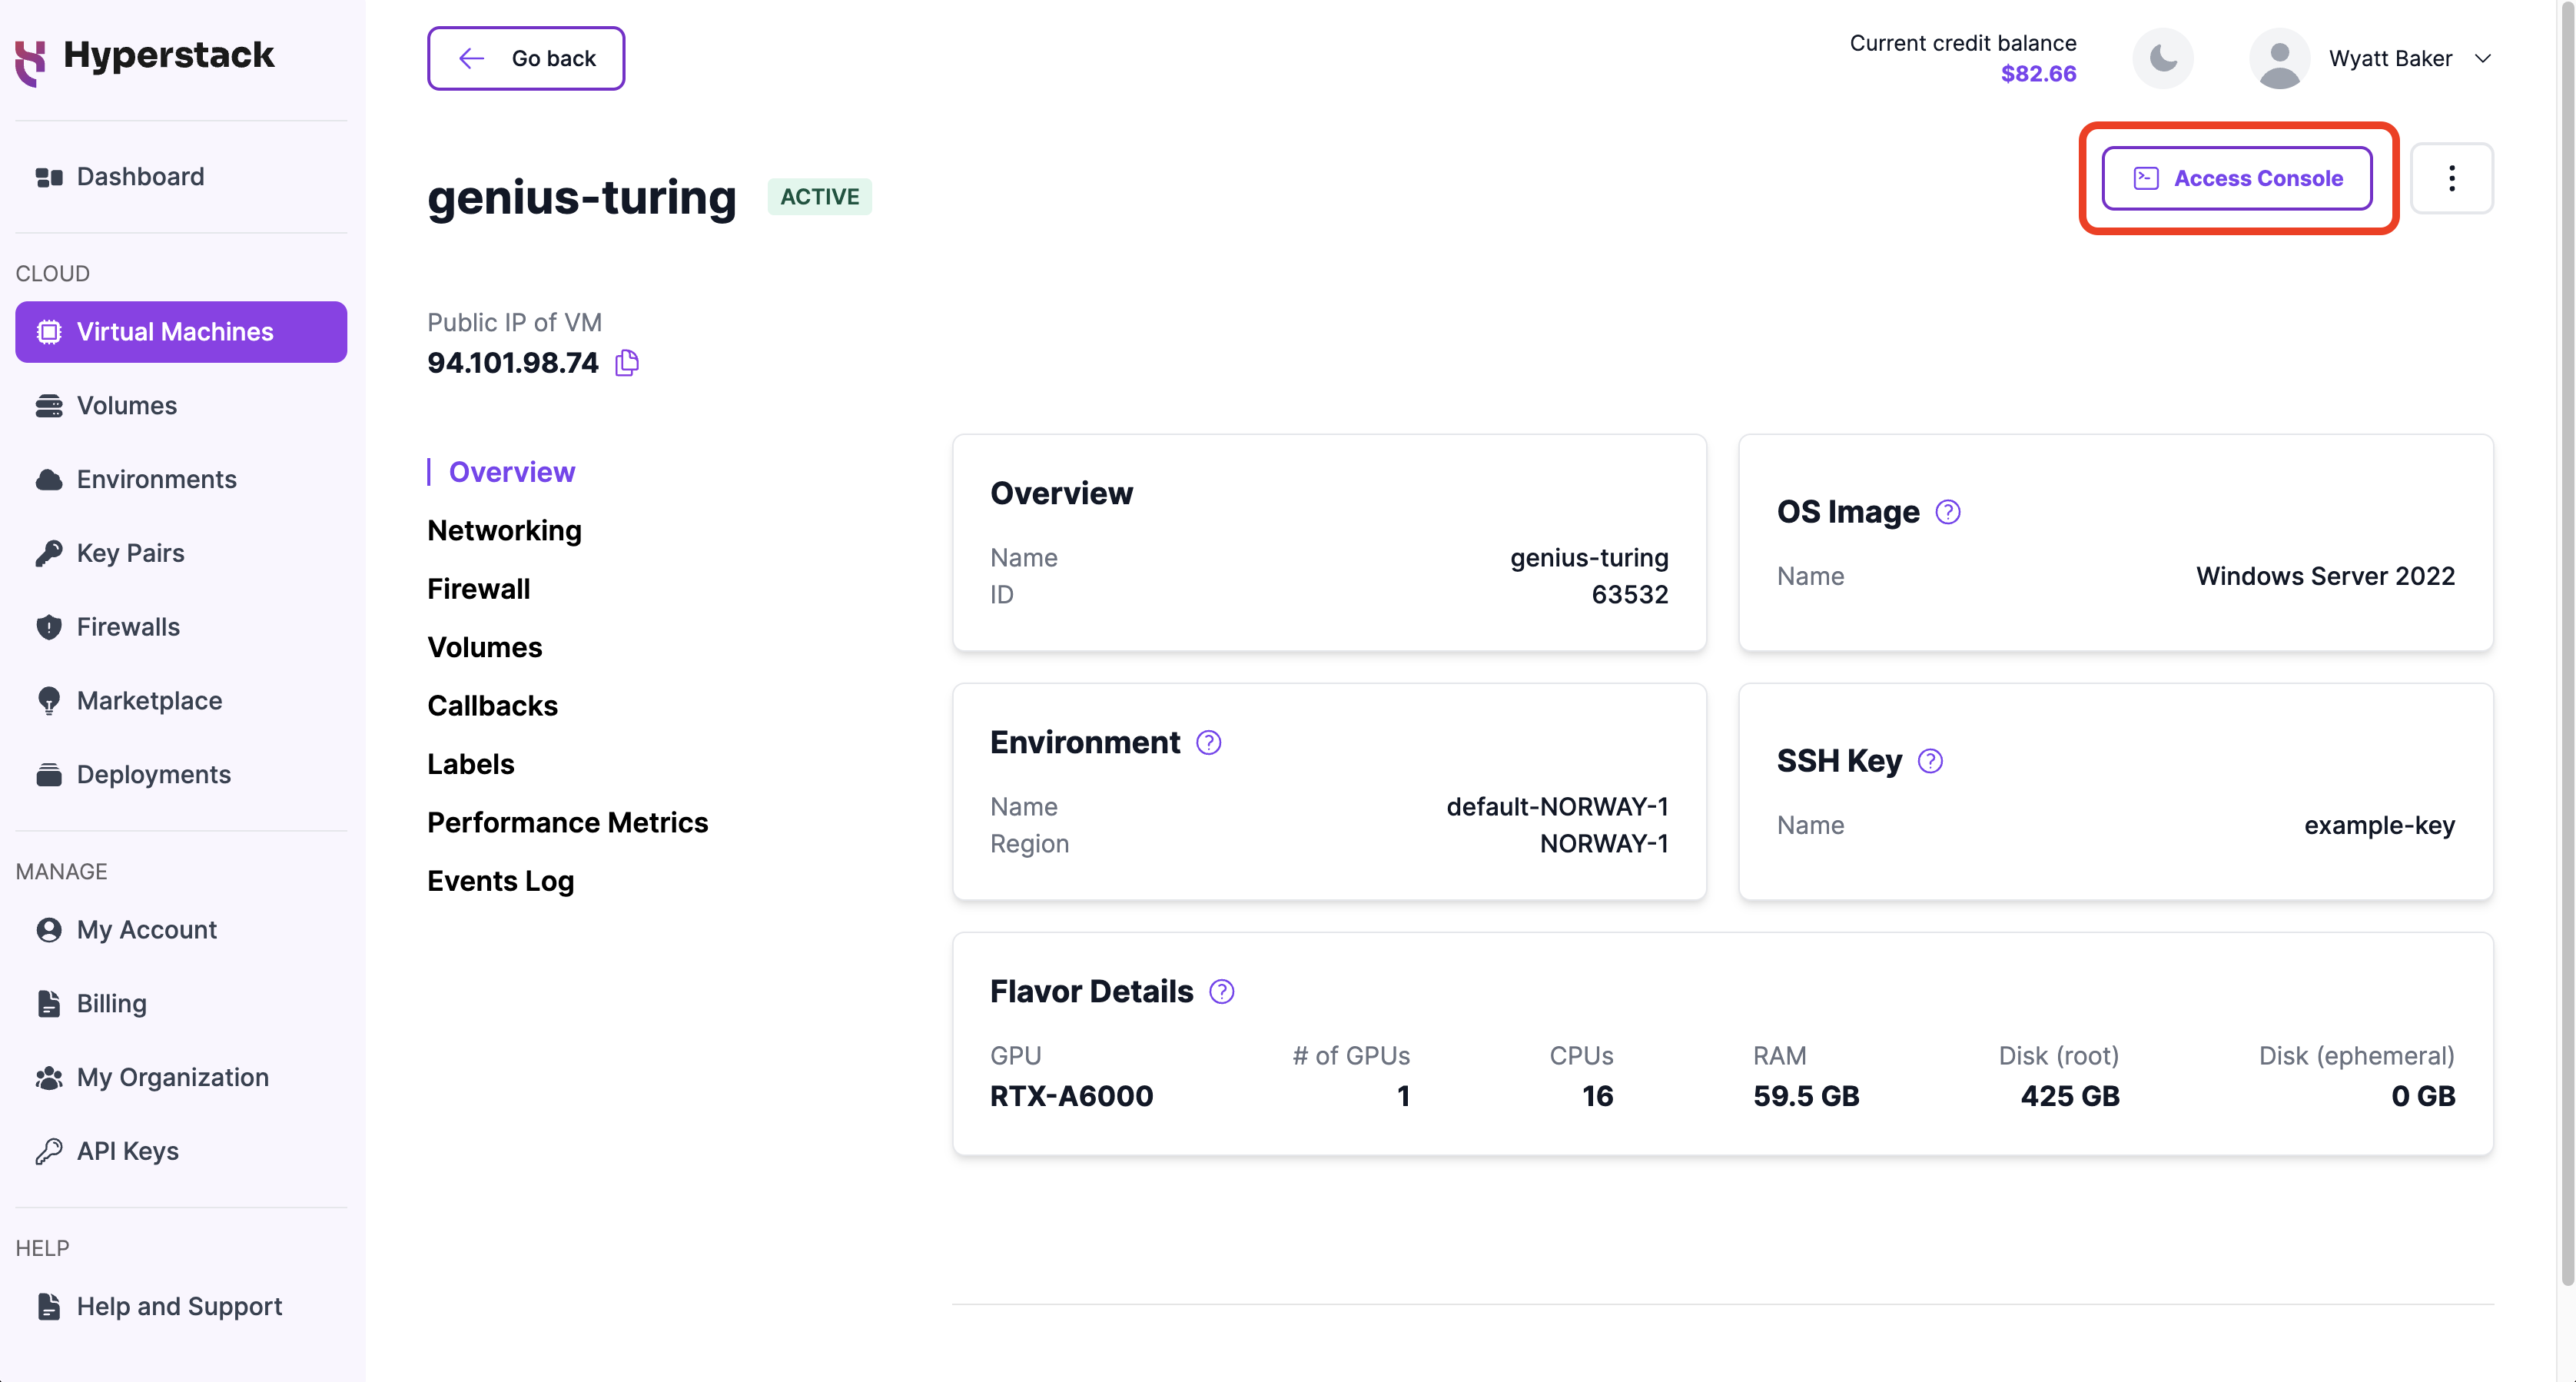
In Hyperstack, navigate to the 'My Virtual Machines' page to access your VMs. Click on the name of the VM you wish to establish an RDP connection with to view its details.
-
In the top right corner, click the Access Console button to open the VNC console for the VM.
-
In the VNC console, complete the basic setup wizard for the Windows VM:
a. Set a password for your administrator account.
b. Send CTRL + ALT + Delete.
c. Sign into your Administrator account using your password. -
Once you sign in, you will see the message popup shown below. Click Yes to enable network connectivity for the VM.
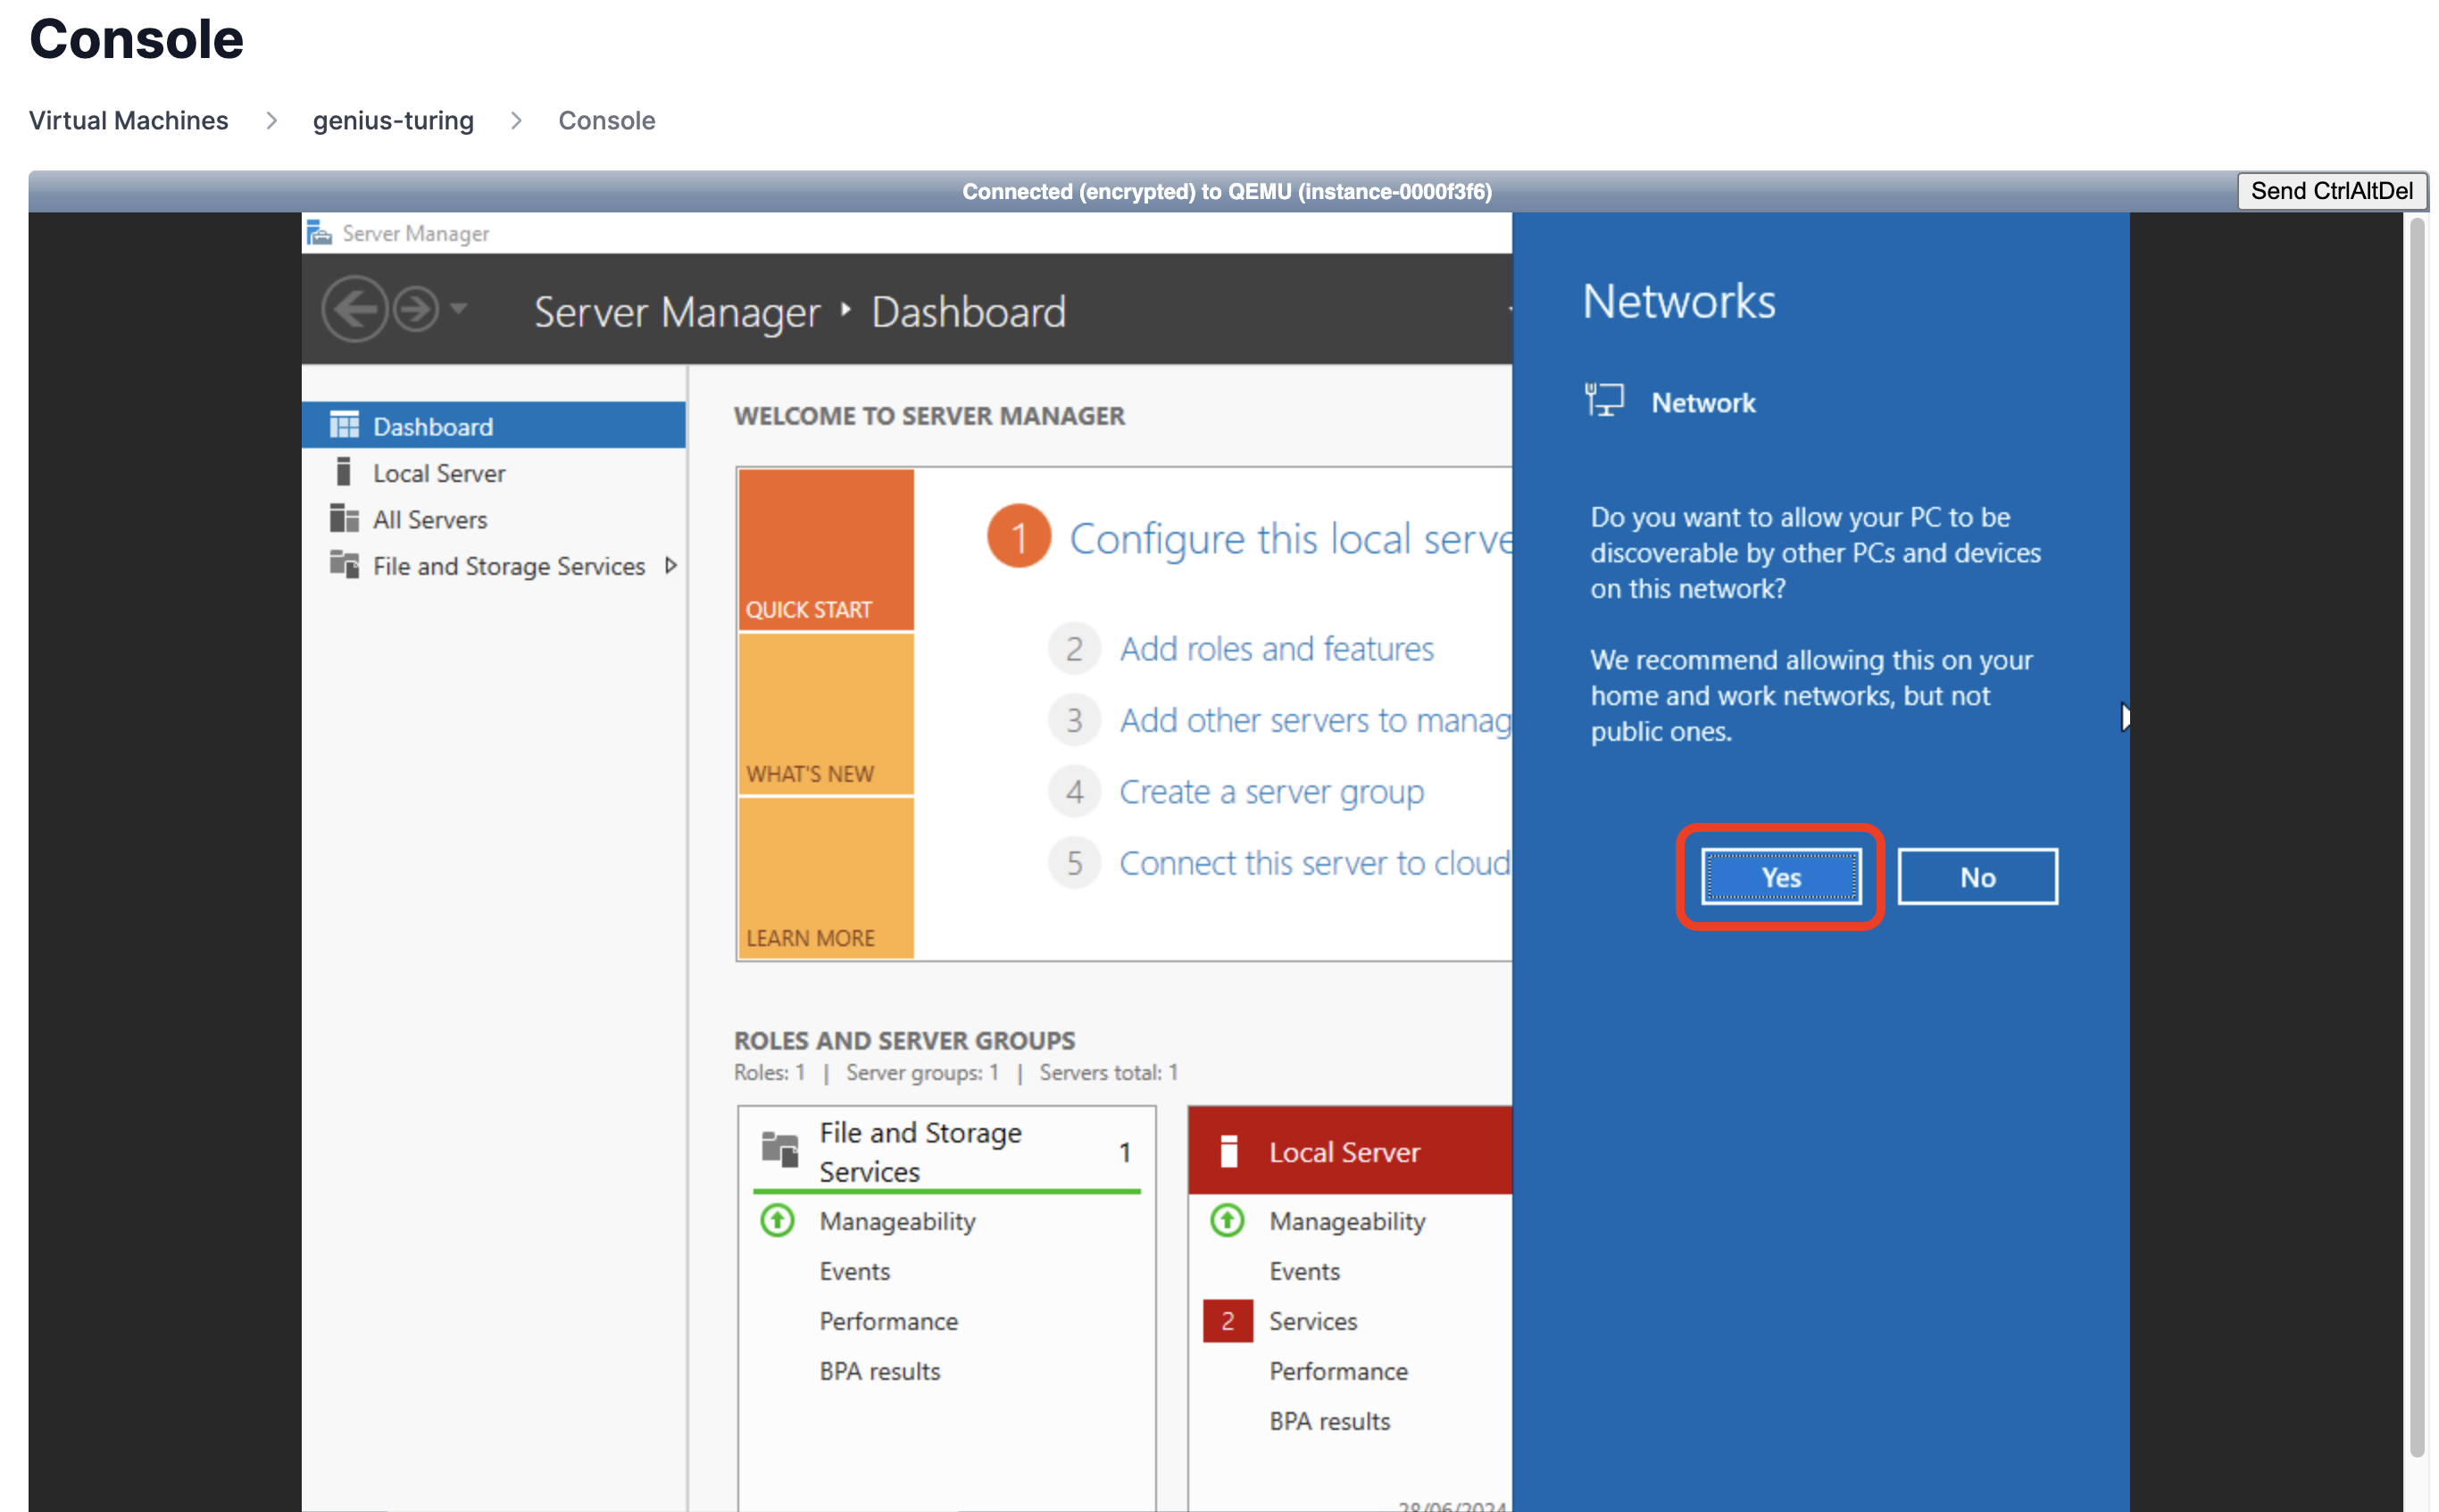
-
In Server Manager, click Local Server and verify that Remote Desktop is enabled.
2. Enable TCP connectivity
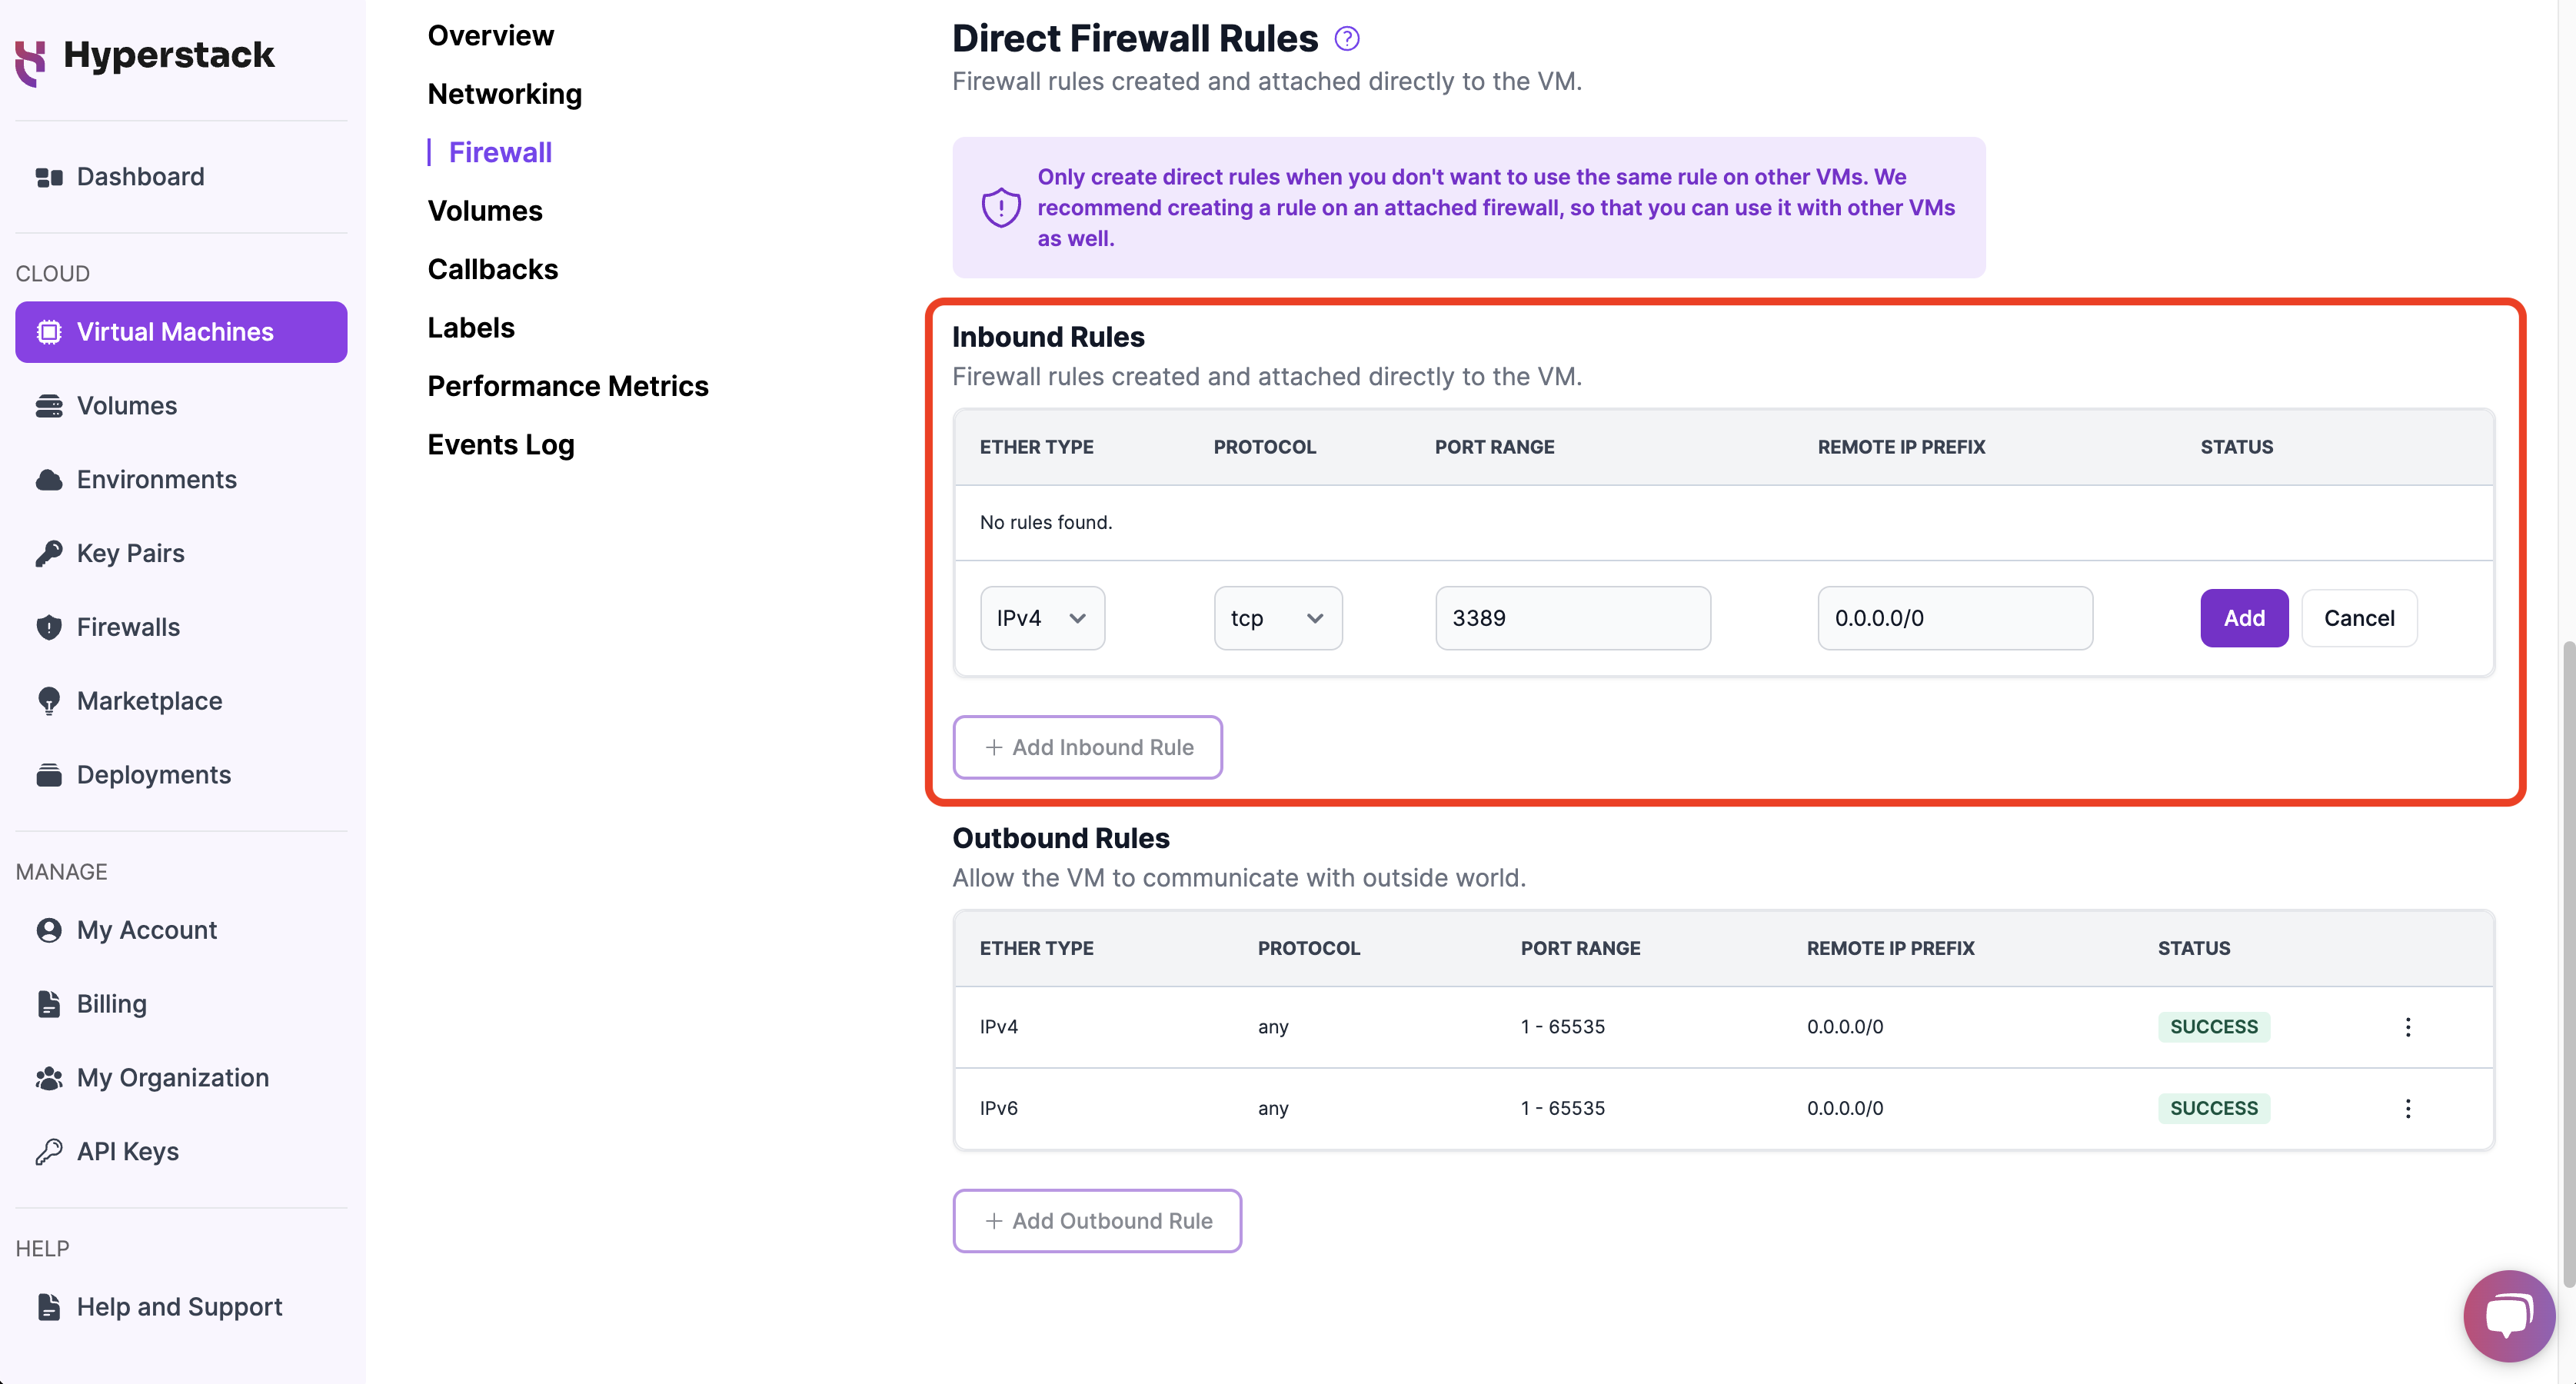
Learn how to create a direct firewall rule to enable RDP connectivity on port 3389 by following the instructions below:
-
In Hyperstack, go to the 'My Virtual Machines' page to access your VMs. Click on the name of the VM you wish to establish an RDP connection with to view its details.
-
Navigate to the Firewall tab on the VM's details page. Under the Direct Firewall Rules section, click + Add Inbound Rule in the Inbound Rules section.
-
Select the TCP protocol and specify port range 3389 (the default RDP port). Additionally, enter the IP address of the computer you are using to connect to the VM via RDP in the Remote IP Prefix field to restrict access to your IP only. When completed, click the Add button to create the firewall rule.
3. Verify TCP connectivity
Open a command prompt and use telnet to check if the VM's port 3389 is open:
telnet [VM_Public_IP_Address] 3389
- Replace
[VM_Public_IP_Address]with the public IP address of the virtual machine you are trying to connect to.
If the port is open, you will see the following connection message. Proceed to step 4. Connect to the VM via RDP
Trying 149.36.0.98...
Connected to 149.36.0.98.
If you are unable to connect, this means that the port is closed. Review your firewall settings to ensure the port is open by reviewing the steps outlined above.
Trying 149.36.0.88...
telnet: connect to address 149.36.0.88: Connection refused
telnet: Unable to connect to remote host
4. Connect to your VM via RDP
- Windows
- macOS
- Linux
- Click Start.
- In the search box, type Remote Desktop Connection and select the appropriate item.
- In the Remote Desktop Connection window, enter the public IP address of the VM in the Computer field.
- Click Connect.
- Specify the account settings:
- User name:
Administrator - Password: (Enter your password)
- User name:
- Click OK.
If you encounter the issues "Access is Denied" or "User is not authorized" when attempting to connect via RDP, follow the troubleshooting steps outlined below.
Troubleshooting user access issues
Make sure that the user account belongs to a group that has the right to sign in remotely to the remote computer. Use the following procedures, depending on how you manage user access rights on the remote computer. Remember that Group Policy settings override Local Security Policy settings.
If you use Group Policy at the domain level, follow these steps:
- On the Server Manager Tools menu, open the Group Policy Management Console (GPMC), right-click the Group Policy Object (GPO) that controls the remote computer, and then select Edit to open the Group Policy Editor.
- Select Computer Configuration > Policies > Windows Settings > Security Settings > Local Policies > User Rights Assignment.
- Select Allow logon through Remote Desktop Services. If the policy is enabled, right-click Allow logon through Remote Desktop Services, and then select Properties. If the policy isn't defined, see the next procedure to check the local security policy.
- Check the groups that have been assigned this right. If the user doesn't belong to a group that has this right, either add the group to the policy or add the user to one of the groups that is already configured.
If you use local security policy, follow these steps:
- On the remote computer, open Local Security Policy.
- Select Security Settings > Local Policies > User Rights Assignment.
- Select Allow logon through Remote Desktop Services, and check the list of groups in Security Settings. If the user doesn't belong to a group that has this right, either add the group to the policy or add the user to one of the groups that is already configured.
- To add a group to the policy, right-click the policy, and then select Properties. Select Add User or Group, and then select a group.
For solutions to other user access issues, refer to the official Microsoft documentation.
- Install and run Microsoft Remote Desktop (the official free RDP client for Mac).
- Click
+→ Add PC. - In the Add PC dialog, enter the public IP address of the virtual machine in the PC name field.
- In the User account field, select Add User Account.
- In the Add a User Account dialog, specify the account settings:
- Username:
Administrator - Password: (Enter your password)
- Username:
- Click Add twice.
- Connect to the remote machine by double-clicking the connection you created in the main Microsoft Remote Desktop window. group.
- Install Remmina (a free RDP client for Linux) using the commands:
sudo apt-add-repository ppa:remmina-ppa-team/remmina-next
sudo apt-get update
sudo apt-get install remmina remmina-plugin-rdp - Start Remmina.
- Click
+. - Fill in the Profile block as follows:
- Name: Name for the connection.
- Protocol: RDP - Remote Desktop Protocol.
- In the Basic tab, specify the details for connection and authorization:
- Server: Public IP address of the virtual machine.
- User Name:
Administrator - Password: (Enter your password)
- Click Save.
- Connect to the remote machine by double-clicking the connection you created in the quick access connection list.
It may take a few minutes to initialize RDP, and in rare cases, the process may take significantly longer than expected.