Create an SSH Key for Multiple Users
- Hyperstack
- Bash shell commands
To generate an SSH key that enables VM access with multiple public keys in Hyperstack, please follow these steps:
-
In Hyperstack navigate to the Key Pairs tab and click the "Create a new Key Pair" button.
-
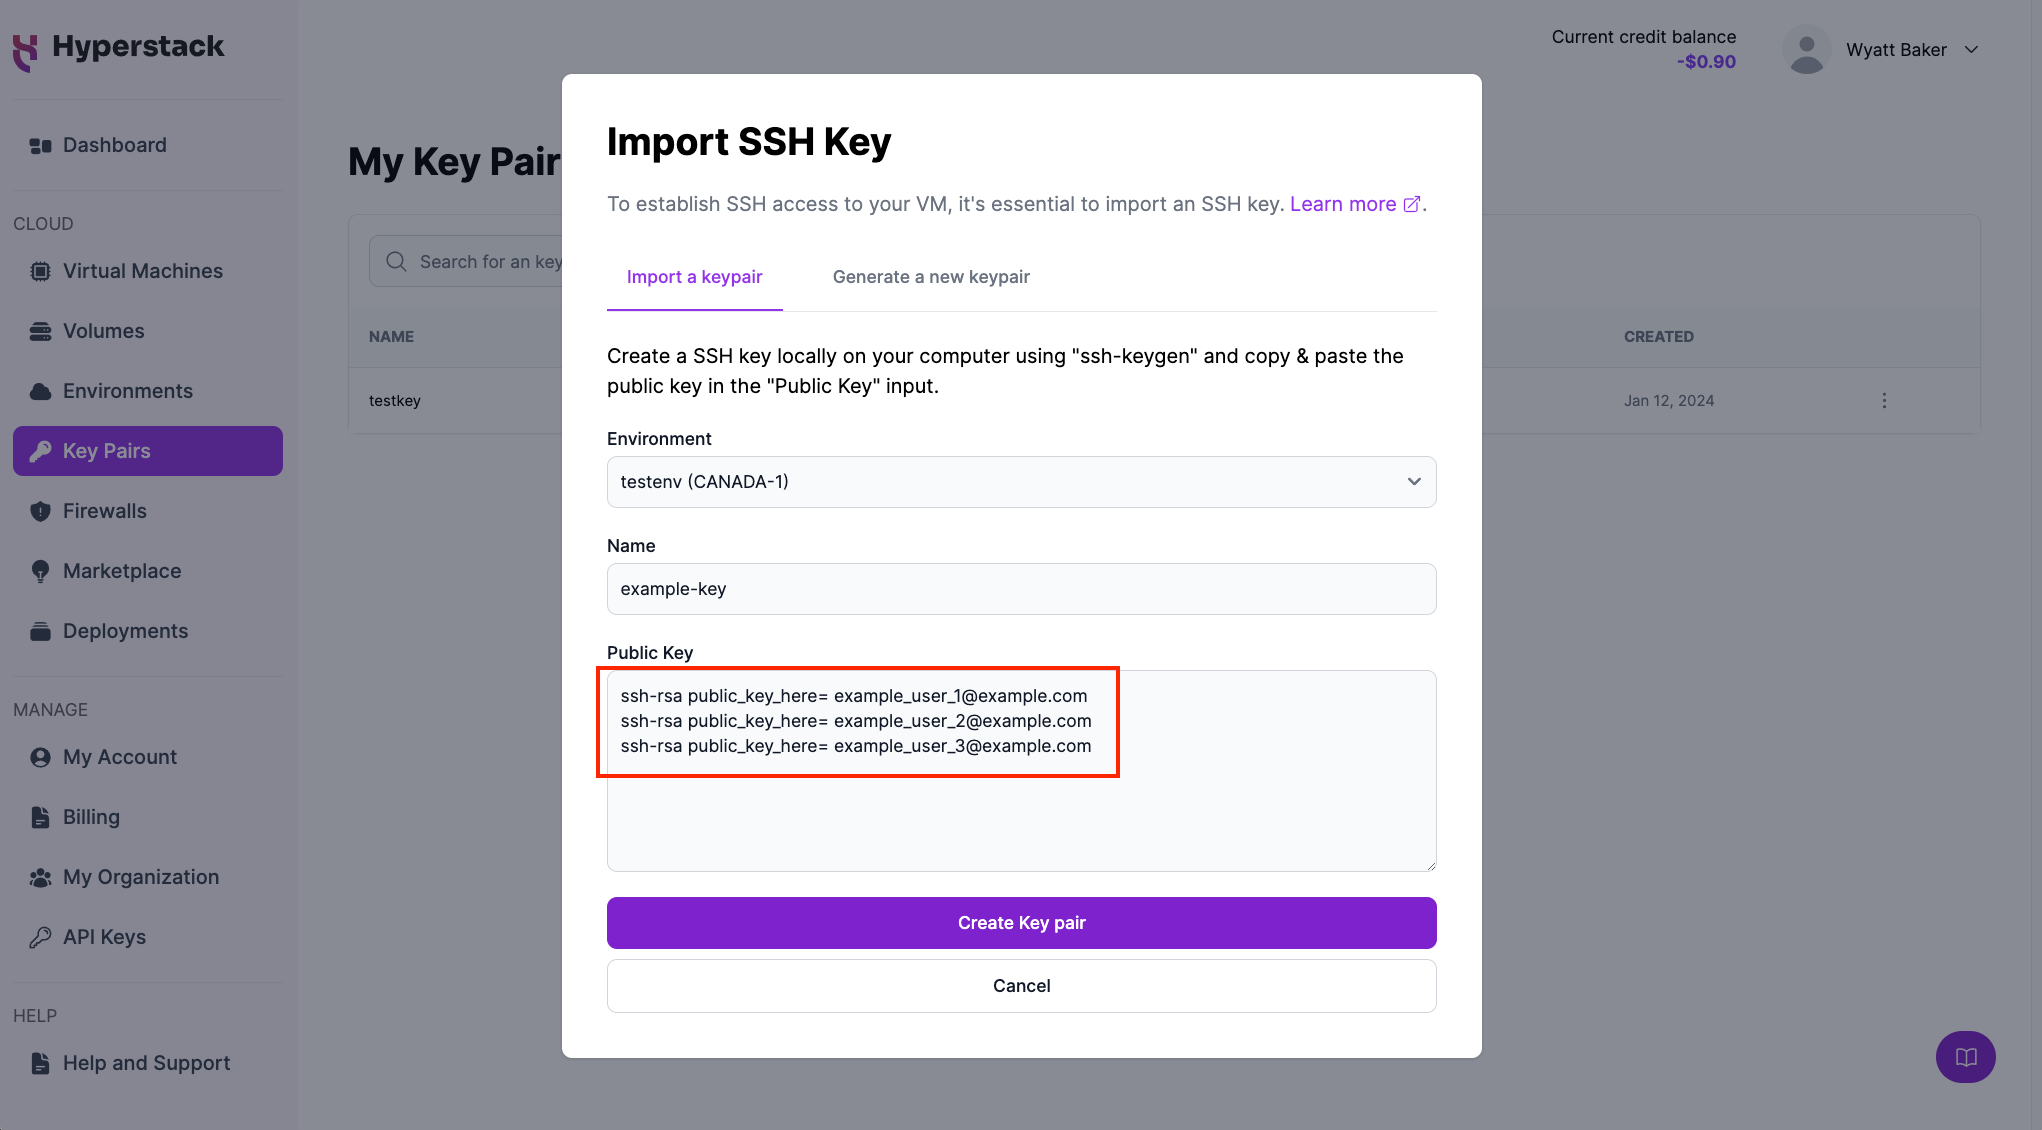
In the Import SSH Key popup, select an environment, assign a name to the SSH key, enter the public keys from your team (one per line) into the Public Key field as illustrated below, and click the "Create Key Pair" button.

-
Launch the VM with the corresponding SSH key and verify the functionality of the SSH key by logging into the VM from the user accounts associated with the provided public keys.
To grant access to a virtual machine using multiple SSH public keys, you must add these keys to the ~/.ssh/authorized_keys file for each user account. Follow these steps for a seamless setup:
1. Obtain SSH public keys for users to grant them access
First, you need to obtain the SSH public keys from your teammates. These keys typically end in .pub and resemble something like ssh-rsa AAA.... Ensure you receive this key from your teammate, either via email, a secure message, or another reliable method.
2. Log Into Your Server
Use SSH to log into your server where you want to add the public key. For example:
ssh your_username@your_server_ip
3. Switch to the target user account
If you are adding this key for a different user account than the one you are currently logged into, you'll need to switch to that user. You can do this with the su (switch user) command or by logging in directly to that user if you have the credentials. For example, to switch to the user john, you can use:
su - john
4. Navigate to the SSH directory
Once logged in as the target user, navigate to their .ssh directory in their home folder. If this directory doesn't exist, you'll need to create it along with the authorized_keys file. Here's how to do it:
cd ~  # This takes you to the user's home directory

mkdir -p .ssh  # Creates the .ssh directory if it doesn't exist

touch .ssh/authorized_keys  # Creates the authorized_keys file if it doesn't exist
5. Edit the authorized keys file
Now, add the user's public key to the authorized_keys file. You can do this by using a text editor like nano or vim, or simply append the key using the echo command. For example:
echo user_public_key_here >> ~/.ssh/authorized_keys
Replace user_public_key_here with the actual public key string your teammate gave you.
6. Set proper permissions
For security, SSH requires strict permissions for the .ssh directory and the authorized_keys file. You can set these permissions using the following commands:
chmod 700 ~/.ssh

chmod 600 ~/.ssh/authorized_keys
7. Verify SSH access
Finally, your teammate should attempt to SSH into the server using the private key corresponding to the public key you just added. Use the following command.
ssh -i /path/to/private_key user@server_ip
Make sure they replace /path/to/private_key with the path to their private key file, user with their username on the server, and server_ip with your server's IP address or hostname. If everything is set up correctly, your teammate should be able to log into the server without being prompted for the user's password on the server. Remember, this process adds the key for SSH access and does not grant any additional privileges your teammate wouldn't otherwise have; those are controlled by the user account's permissions on the server.